Customers are entitled to a full refund less a restocking fee of 15% will be charged on all returns made within 45 days of shipment, unless items are returned for repair or warranty service. ALL returns must be sent with a valid RMA number which we will assign to your item after you contact us.
If you believe that you have defective equipment we will work with you to resolve the issue and repair or replace once a diagnosis has been completed. Please contact info@vinmetrica.com or call +1 760 494 0597 and select Tech Support, with any questions.
Warranty Information:
The SC-100A, SC-200 and SC-300 units each come with a 2 year warranty. Any electrodes come with a 1 year warranty and all plastics, lab equipment and reagents come with a 6 month warranty.
While the reagents only have a 6 month warranty (this is because we do not know how the reagents are treated once they leave our hands), with proper care most of them should last at least two years. All reagents have a use by date clearly printed on the labels.
Vinmetrica’s warranties and liabilities are:
1. Instruments, electrodes and non-reagent accessories are warranted against defects in workmanship for 24 months from date of purchase. The reagents are warranted to perform as described in the manual up until any stated expiration or “use-by” date, or 6 months after purchase, whichever is later. THE WARRANTIES IN THESE TERMS AND CONDITIONS ARE IN LIEU OF ALL OTHER WARRANTIES, EXPRESS OR IMPLIED, INCLUDING WITHOUT LIMITATION ANY WARRANTIES OF MERCHANTABILITY, NONINFRINGEMENT, OR FITNESS FOR A PARTICULAR PURPOSE, SAID WARRANTIES BEING EXPRESSLY DISCLAIMED.
2. Buyer agrees that its sole and exclusive remedy against Vinmetrica shall be limited to the repair and replacement of Materials or parts of Materials, provided Vinmetrica is promptly notified in writing, prior to the expiration of the warranty period specified above, of any defect. Vinmetrica’s liability for any damages due Buyer shall be limited to the purchase price of the Materials.
3. VINMETRICA’S MAXIMUM LIABILITY FOR ALL DIRECT DAMAGES, INCLUDING WITHOUT LIMITATION CONTRACT DAMAGES AND DAMAGES FOR INJURIES TO PERSONS OR PROPERTY, WHETHER ARISING FROM VINMETRICA’S BREACH OF THESE TERMS AND CONDITIONS, BREACH OF WARRANTY, NEGLIGENCE, STRICT LIABILITY, OR OTHER TORT WITH RESPECT TO THE MATERIALS, OR ANY SERVICES IN CONNECTION WITH THE MATERIALS, IS LIMITED TO AN AMOUNT NOT TO EXCEED THE PRICE OF THE MATERIALS. IN NO EVENT SHALL VINMETRICA BE LIABLE TO BUYER FOR ANY INCIDENTAL, CONSEQUENTIAL OR SPECIAL DAMAGES, INCLUDING WITHOUT LIMITATION LOST REVENUES AND PROFITS.
The SO2 reagents and the pH/TA reagents are all warranted to last for 1 year, and we now give a use-by date that is 2 years from date of manufacture; in fact generally all SO2 and pH/TA reagents can be used several months beyond the use-by date. To ensure best stability, always store tightly capped and out of high temperatures and sunlight. And of course, the reagents will last much longer if not cross-contaminated with each other!
Part of the LCD display on my analyzer has gone out and I can no longer read full digits on the display. Can you repair my unit? Or do I have to buy a whole new one?
If there are segments of the LCD display that no longer illuminate or whole numbers have disappeared there is probably an issue with the LCD screen itself. Most often, a replacement LCD screen can be installed and this fixes the issue. Typically, when the LCD screen goes out the instrument will still work okay. If this has happened to you, please call or email our tech support for an RMA number and we can give you additional instructions.
Sometimes, although rarely, there are other issues with the circuit board that cannot be fixed. If this is the case, the unit will need to be replaced.
If a repair/replacement is needed and the unit is out of warranty there are costs associated with these services. The units are covered under a 2 year warranty. If it is out of warranty the cost of the LCD screen replacement is $75 plus return shipping.
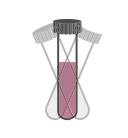
Should I choose the 10 ml or 25 ml burette in the SC-300 Pro Kit or the Deluxe Lab Accessory Kit?
There is no major difference between the two sizes of burettes besides the difference in capacity. We recommend the 25mL burette if you will be doing multiple tests in a row as the larger capacity allows you to run multiple tests without having to refill the burette with Titrant. The 10mL burette is slightly more accurate as the gradations on the burette are finer so you can read it to one additional decimal point.
The most popular is the 25mL burette although the 10mL is also a good option too. It is just whichever you prefer.
If you think you may want to do the ABV Assay or the RRS Assay in the future you may want to purchase your Pro Kit or Deluxe Lab Kit with the 10mL burette as those two assays require the 10mL burette in order to get accurate results. Or you can simply purchase an individual 10mL burette at a later time.
The connector on my analyzer spins freely… is that normal?
If the connector itself is loose and can be pulled out of the housing then the instrument will need to come back to us for repair (if it is still under warranty). If it is out of warranty, please call us and we may be able to direct you on how to fix this.
If indeed you have the older RCA plug (gold connector), it sometimes fails to make good contact with the receptacle at the outer grounding ring; in that case try squeezing the outer grounding ring on the plug by ever so slightly compressing it with a pair of pliers. More information about this can be found on our Troubleshooting Guide on the Support tab.
How many tests can be performed with the SO2 and pH/TA Reagents that came with my SC-300? (Or SC-100A or SC-200)
The SO2 reagents included in the SC-300 should allow you to perform about 50 SO2 tests
The TA Titrant should be enough for about 30 TA tests.
The pH Reference Solutions should be good for an unlimited amount of tests. If you are careful enough and rinse your electrode well, you can simply place the pH probe straight into each of the reference solution bottles to calibrate. Make sure the solution is mixing at all times.
All these reagents have a 2-year shelf life.
Can I use distilled water rather than DI water?
Distilled or DI water are okay to use. Make sure they are fresh too.
Click Here to Find One of Our Distributors in Your Area
Our full distributor list can be found on our “Find A Distributor” page.
Shipping Questions
What are your shipping and order processing times?
Order Processing:
We aim to process orders within 48-72 hours of receipt. Sometimes we can get orders out within 24 hours. Our offices are closed Friday afternoons and weekends so orders will not be processed during these times. Sometimes order processing can be delayed and we will do our best to send you individual updates about your order. If you have any questions about our current order processing times you can view updates on the Checkout page or you can email info@vinmetrica.com.
Shipping:
Vinmetrica is required to ship most of our items via GROUND shipping due to shipping regulations on the items we produce and sell. Some items can be shipped via quicker methods but you will need to contact us for additional information.
We are located in S. California. Shipping can take anywhere from 1-10 days to get to you depending on your location. Delays in shipping are out of our control and happen at the discretion of the carrier. If they impose any delays on your shipment there is usually nothing we can do about it. Yes, sometimes they may claim a weather delay in your city when in fact the weather is fine. This is out of our control but will generally only delay your order by a day or two. Upon the completion and shipment of your order we will send you an email notification with your tracking number. Use this to track your order. If there are any issues with its delivery please contact us.
Do you offer Free Shipping?
Yes. We offer Free Shipping on orders over $89. This is subject to change at our discretion based on the rates of the shipping carrier.
When you select “Free Shipping – Orders over $XX” your order will be shipped via FEDEX GROUND as required. We cannot offer any other methods of shipping due to the chemical nature of the items that we sell. If you want additional information on our shipping methods or to find out if we can ship your order faster than ground please contact us, info@vinmetrica.com OR check our our distributor page to see if one of our distributors is close to you.
pH/TA Questions
I want to do a TA test, but the main acid is not Tartaric Acid. Can I report TA as Lactic Acid in beer or malic acid in cider ?
Yes! The SC-200 or SC-300 can be used to test beer, cider or any other beverages. The pH is independent of the beverage or whatever solution it’s measuring.
The TA is also; it’s just a matter of how you calculate and report the final answer. Wine TA is usually reported in terms of tartaric acid, but the Vinmetrica TA titration actually measures acidity as equivalents per liter (eq/L), converting it to g/L of tartaric acid by the equation
TA (g/L tartaric) = 2 * V
as in the manual. The equation assumes the acid is mostly tartaric (true for wine) and incorporates tartaric acid’s equivalent weight** of 75 g/eq into its factor of 2.
For measuring the TA levels in a sour beer you would use the equivalent weight for lactic acid (90 g/eq) since that is the prevalent acid. You can adjust the result of using the above equation to report lactic acid instead of tartaric as follows:
g/L lactic = 90/75 * g/L tartaric.
For TA levels in cider, use the equivalent weight 67 for malic acid since that is the prevalent acid.
**Equivalent weight = molecular weight divided by the number of acid groups. Tartaric and malic acids both have two acid groups, so their equivalent weights are one-half of their molecular weights. Lactic acid has only one acid group, so its equivalent weight and molecular weight are the same.
I measured the pH of distilled water, expecting it to be 7.0, but instead it came out way different! Is something wrong with my equipment?
Don’t frustrate yourself trying to interpret the pH of pure water. In principle, very pure water should indeed have a pH of 7.0, but usually it is 5 to 6 because atmospheric CO2 dissolves readily into the water to produce carbonic acid. Some deionizers will produce perfectly pure water that is nevertheless slightly alkaline, pH 7.5 – 8. Check your pH calibration instead with cream of tartar.
What should I do if my pH electrode is difficult to calibrate, or is acting sluggish/erratic?
NOTE: in most cases, calibration problems can be addressed by steps 1-6 below. If your electrode is slow or showing numbers way out of range, try the meter test FIRST (steps 13-16 below). The reconditioning steps (7 – 12) should not normally be needed on an electrode that is less than 6 months old.
1. Be sure your electrode has been stored at least 24 hours in a proper electrode storage solution (Vinmetrica’s product is 3M potassium chloride in 10 mM potassium hydrogen phthalate; other similar products may be used). The entire bottom 1 inch of the electrode needs to have been submerged for at least 24 hours. If this has NOT happened, wait until it has!
2. IMPORTANT! Always stir or gently agitate the solution when using the pH electrode; letting it sit static will cause drift and inaccurate readings!
3. When calibrating your pH electrode, remember that the displayed pH may not be correct until AFTER you press ENTER, and the “Good Cal” message finishes scrolling.
4. If the instrument signals stable pH (i.e., the Cal LED is flashing) but displays “Bad Cal” after pressing ENTER, try putting it flat on the table; when the next stable pH is signaled, press the ENTER button quickly without handling the instrument. Sometimes the instrument may pick up noise from its environment, particularly if you handle it at the last second, while it’s trying to achieve a stable reading.
5. If values appear to drift, leave the electrode in the pH 4.01 reference solution for 30 minutes.
6. If you intend to read pH values in samples that are at a different temperature than ambient, it’s best to have your reference solutions at that temperature also before calibrating.
7. You can restore the pH calibration and bias (DAC setting) values to factory defaults in Test Mode (see Appendix A, Section 13 in your manual). Contact tech support if you have questions beyond this.
Reconditioning and cleaning of pH electrodes
Note: before you try the procedures that follow in steps 8-12, try the simple step of soaking the electrode in your pH 4.01 reference solution for about 1 hour, then try to calibrate. Sometimes this is all that’s needed!
Even in normal use and storage, performance of pH electrodes may show deterioration over time, which typically shows up as noisy, erratic or sluggish electrode readings, and/or difficulty calibrating. Assuming the meter itself is working (see “Meter test” below), then there are two main causes for this:
A. Clogging of the reference junction (most likely).
B. Fouling of the glass membrane (happens occasionally, or after prolonged service).
The following procedures will often provide renewed stability and pH sensitivity. If the electrode cannot be restored by one of these methods, it needs to be replaced.
Unblocking the reference junction:
The reference electrode junction is usually the problem when the electrode can’t calibrate in its expected ranges. This junction is a fine-pored frit that allows electrical contact of a reference electrode with the solution being tested. It can become clogged over time.
8. Soak electrode in hot (NOT boiling!) water, about 60 °C, for 5 – 10 mins. Allow to cool to room temperature then place in pH 4 reference solution for 5 minutes. Try to recalibrate. If this does not work, try the next step.
9. Place electrode in electrode storage solution (from Vinmetrica, or 3M KCl with optionally added 0.01M potassium acid phthalate, KHP) at 60 °C and allow electrode and solution to cool to room temperature, then place in pH 4 reference solution for 5 minutes. Try to recalibrate. If this does not work, try the next step.
10. Soak in 0.1M HCl (note: this can be made by diluting 1 mL of the SO2 Acid Solution with 20 mL DI water) or HNO3 for 1 hour. Rinse with DI water, then place in pH 4 reference solution for 5 minutes. Try to recalibrate. If this does not work, try the next step.
11. Soak in 1:10 dilution of bleach in a 0.1 – 0.05 % solution of liquid detergent in hot water with vigorous stirring for 15 mins. Rinse with DI water, then place in pH 4 reference solution for 5 minutes. Try to recalibrate.
Cleaning the pH electrode’s glass membrane:
The glass bulb is a thin membrane of a special kind of glass that actually does the job of responding to the pH of the solution. It can sometimes become dirty and poorly responsive.
12. Immerse electrode tip in 0.1M HCl (see above for how to make) for about 15 secs., rinse with distilled water, then immerse in 0.1M NaOH (you can use a little of your TA Titrant for this) for another 15 sec. Cycle the electrode through these solutions several times (rinsing with DI water in between), then rinse and check for performance in pH buffer 4.00 and 7.00.
Meter test
You want to be sure that the instrument is responding correctly. A quick test is to simply short out the electrode connector:
13. Put the instrument in pH mode.
14. Remove the electrode to expose the BNC connector at the back of the instrument. Short out the terminals on the connector, using a paper clip or similar metal piece to touch the center pin of the connector to its outer metal sheath.
15. With the input shorted out, the reading should be pH 7.00 +/- 0.5. If out of this range, the meter is probably bad. Contact us.
16. Bear in mind that this test is not 100% fool-proof (the instrument might still have trouble reading pH values different from 7.00), but generally if this test passes, it is much more likely to be an electrode problem.
pH test with cream of tartar
A quick way to check your calibration and pH accuracy is to measure the pH of a saturated solution of cream of tartar which has a pH of 3.56 at 25 degrees celsius:
a. Get pure cream of tartar (grocery store stuff is fine, provided it’s pure), or even better is reagent grade potassium hydrogen tartrate, also known as potassium acid tartrate or potassium bitartrate. Call it KHT for short.
b. Place about 1/4 teaspoon of KHT in 20 mL of distilled water. Mix well for about 30 seconds. You want to be sure the solution is saturated, i.e., everything that can dissolve, has dissolved. There should be some undissolved solid left.
c. Decant or filter the solution off the solids.
d. This solution has a standard pH of 3.56 at 25 degrees C (78 degrees F). It should be within 0.02 pH of this value at temperatures from 20 to 30 degrees Celsius. Discard after 24 hours.
How much does pH measured with the SC-200 & SC-300 vary with temperature?
After calibrating the unit in both the 4.01 and 7.0 solutions in my house, I go out to test my 52 degree wine tank. Is that okay?
The SC-300 does not have temperature compensation (ATC), however the difference in a pH measurement between 52F and 70F for most solutions is pretty small, less than 0.05 pH units in most cases depending on what the solution is.
If you need to make measurements at 52F, for best accuracy we recommend calibrating with 4 and 7 solutions that are at that temperature. You can do this by storing your pH calibration solutions in the same room as your wine tanks.
You can check calibration at room temperature with a saturated solution of cream of tartar (potassium hydrogen tartrate, KHT for short). Add 1/8 tsp KHT to 20 mL distilled water, stir for 30 sec. pH is 3.55 at 70F. At lower temperatures the saturated KHT is not standardized, but will be between 3.50 and 3.60, so you can confidently check your calibration at 4 and 7 this way.
The ability to test pH with ATC may be an available feature in 2021. Keep an eye our for any announcements in our newsletters.
Additional Information:
There is very little variance of the pH measurement of wine if you are operating within plus or minus 27 degrees F (+/- 15°C) of room temperature, 77° F. The table below will let you know what are typical readings from the pH meter using our reference solutions or other buffers at different temperatures. If you operate the pH meter close to room temperature, 77° F (approximately 25°C) , with the wine sample and the reference solutions also close to room temperature, you should have acceptably accurate measurements with a variance +/- 0.02 pH units.
If you are operating in outdoor conditions or in a cold cellar, the chart below should let you know how much variance is to be expected regarding pH buffers and our pH 4 and 7 reference solutions as well. Since most wines fall within a pH range 3.0 to 4.0, you can roughly approximate the variance in pH to be similar to a pH 3 buffer, a pH 3.49 check solution (50 mM sodium diglycolate), and the pH 4.01 reference solution provided with the SC-200 and SC-300. Even a change in temperature of +/- 27°F from room temperature doesn’t change the pH more than +/- 0.03 pH units with the three solutions mentioned above, so unless you are operating below 50°F or above 104°F, the pH measurements accuracy due to temperature variation is very close to the error of the instrument (+/- 0.02 pH).
PH Variation with Temperature
Temperature °C
Temperature °F
pH
pH 3 buffer (phthalate)
0
32
2.91
5
41
2.912
10
50
2.918
15
59
2.919
20
68
2.924
25
77
2.932
30
86
2.936
35
95
2.944
40
104
2.953
45
113
2.962
50
122
2.973
55
131
2.984
60
140
2.998
pH 3.49 check solution
5
41
3.47
10
50
3.47
15
59
3.48
20
68
3.48
25
77
3.49
30
86
3.50
35
95
3.51
40
104
3.53
50
122
3.56
pH 4.01 reference solution
0
32
4.000
5
41
3.998
10
50
3.997
15
59
3.998
20
68
4.000
25
77
4.005
30
86
4.011
35
95
4.018
40
104
4.027
45
113
4.038
50
122
4.050
55
131
4.084
60
140
4.101
pH 7.00 reference solution
0
32
7.115
5
41
7.083
10
50
7.056
15
59
7.032
20
68
7.012
25
77
6.994
30
86
6.983
35
95
6.975
40
104
6.968
45
113
6.97
50
122
6.97
55
131
6.97
60
140
6.974
When testing TA, I typically get a lower pH reading after adding 15 ml distilled water to the 5 ml wine sample (i.e. wine is 3.49 pH and wine with 15 ml water is 3.42). This looks like my distilled water may be slightly acidic. Does this skew my final TA results?
The reason that the pH of wine drops on adding distilled water has nothing to do with the water or, up to a point, with the degree of dilution. Rather it has to do with the nature of the pH electrode and how it measures pH. pH is generally considered to be -log[H+], i.e., the negative logarithm, base 10, of the hydrogen ion concentration, but formally it is defined as -log(hydrogen ion activity). Activity a and concentration c are related but not identical: a = g x c where g is the “activity coefficient”. It is this coefficient that is changing as you dilute your wine, becoming closer to 1 with dilution. The pH electrode responds to hydrogen ion activity, rather than its concentration per se.
Also, since wine is a fairly strongly buffered system (primarily by the tartaric acid/tartrate ions, and other acids present) you would have to dilute it over a thousand fold to change the hydrogen ion concentration.
To check your pH calibration, suspend about 1/8 tsp (0.5 g) of pure cream of tartar (aka potassium hydrogen tartrate) in 20 mL of water, stir to dissolve for 30 sec. Some crystals will remain. This saturated solution of cream of tartar has a standard pH at 25C of 3.56. I am good with 3.50 to 3.60. If not, try recalibrating. Make this fresh each day.
I get a “Good CAL” with 4.0 & 7.0 buffers and get stable readings on wine samples. However, I can never get a stable pH reading on distilled water. Is it possible to test the pH of distilled water?
A better way to test the validity of pH calibration is to measure the pH of a saturated solution of cream of tartar.
Get pure cream of tartar (grocery store stuff is fine, provided it’s pure), or reagent grade potassium hydrogen tartrate, also known as potassium acid tartrate or potassium bitartrate. Call it KHT for short.
Place about 1/8 teaspoon of KHT in 20 mL of distilled water. Mix well for about 30 seconds. You want to be sure the solution is saturated, i.e., everything that can dissolve, has dissolved. There should be some undissolved solid left.
Decant or filter the solution off the solids if possible.
This solution has a standard pH of 3.56 at 25 degrees C (78 degrees F). It should be within 0.02 pH of this value at temperatures from 20 to 30 degrees Celsius. We usually are OK with a value between 3.50 and 3.60. Discard after 24 hours
It is possible to measure the pH of distilled water, but it’s tricky. In principle pure water has a pH of 7.00 at normal temperatures, but as atmospheric CO2 dissolves in the water the pH will drop slightly due to the formation of carbonic acid. In addition, most distilled water from the store, (which by the way is usually de-ionized, rather than distilled), may have very minor amounts of acidity or alkalinity that takes the pH away from 7.00. So even if you degas and boil the water, you may find the pH still not hitting 7.00 and in any case it will start changing immediately on exposure to air.
However, the pH of your distilled water is unimportant for almost anything you want to do with it, because the water has negligible buffering ability. If you were to take 25 mL of it and do a TA titration for example, you will see that less than 1 drop of TA Titrant takes it to way above pH 9, so in essence it has no detectable acidity.
My local store is suggesting I use a TA Titrant of 0,1 N or 0,2N (sodium hydroxide) as a replacement of the TA Titrant that came with my Vinmetrica SC-300 kit. Will I get the same results?
The 0.133N NaOH (TA Titrant) that we make is specifically designed to be used with our kit when testing your TA levels. You can use the 0.1N NaOH as a replacement for the TA Titrant however there will need to be adjustments made to your final calculations. You cannot use the simple equation listed at the end of the procedure (TA = 2 * V). You will need to use the longer equation listed above it and replace the 0.133N with the concentration of the NaOH solution that you use. This may blur your endpoint slightly so do take care when performing the titration and make sure to not overshoot the endpoint.
I recently purchased the SC-300 and forgot to screw on the pH storage bottle and probe was left to dry for a couple days. Is my pH probe ruined? If not, what should I do?
Place the electrode back in the storage solution as soon as possible. It may come back to life. Soak the probe in the storage solution (but make sure this solution is clean and clear) for a few days and then try and calibrate it and see what happens. If you do not have fresh storage solution you can soak it in the pH 4.01 reference solution until you are able to get fresh pH electrode storage solution.
What’s the best way to add acidity, and how will that change the TA?
The best way to add acidity is: slowly and carefully! As discussed in this BLOG post, add half the amount you think you need, then re-check pH and TA to see where you are.
When you add acidity with tartaric acid (as we recommend) then the TA just goes up by the amount you added (in g/L). As we’ve discussed in the above mentioned blog post, the decrease in pH that this effects depends on the TA (buffering) ability of the wine.
Can I use my SC300 to determine acid level in vinegar? If so how?
Yes, you can use the SC-300 (or -200) to determine total acidity in vinegar. Assuming it is a typical acid strength of 5%, that would be 50 mL/L as acetic acid, which is the same as 50 g/liter (density of acetic acid liquid is 1.0). So, 50 g/L divided by 60 g/mol acetic acid means it would be about 0.83 mol/L acetic acid. In 1.0 mL then, there would be 0.83 mmol of acetic acid. This would take 0.83/0.133 or about 6.2 mL of the TA Titrant (which is 0.133 mmol/mL) to titrate completely.
Here’s the procedure:
1. Measure out as precisely as possible 1.00 mL of your vinegar into a small beaker or other titration vessel.
2. Add about 20 mL of distilled or deionized water.
3. Attach and Insert the pH electrode (it’s a good idea to calibrate it ahead of time). Begin gentle stirring or swirling
4. Put your SC-300 in TA mode and titrate with TA Titrant per the usual method to pH 8.2; record the mL of TA Titrant used as ‘V’.
5. Calculate:
% acetic acid by volume = 0.798 * V
or, if you use some other NaOH Titrant and/or a different volume of sample:
% acetic acid by volume = 100% * V * N * 60 / (S * 1000)
where N is the NaOH Titrant strength (0.133 in our case), and S is the sample volume in mL (1.00 in our case).
The 4.01 solution is now labeled as 4.00. Why is this? Will this affect my results?
The pH 4 reference solution (for use with the SC-200 or SC-300 unit + pH electrode) is now labeled as 4.00, the correct reference value at a temperature of 20 ℃ (68 ℉). The chemical composition of the solution itself is unchanged from before, and its reference value is still 4.01 at 25 ℃ (77 ℉). It’s just that since most of us work on wine or other beverages that are closer to 15 to 20 ℃ (59 to 68 ℉), a value of 4.00 is slightly more accurate than 4.01. Instruments that use the old reference value 4.01 rather than the new value of 4.00 do not produce significant error: less than 0.02 pH difference in wines with pH values from 3.00 to 4.00.
As mentioned in a recent newsletter, we have a new update to the firmware for SC-200s and -300s built after 2015 (Serial numbers 2897 and above for SC-300s, 470 and above for SC-200s). This new firmware, versions 3.2.F (or 2.2.F for an SC-200) and higher, uses the value of 4.00 instead of 4.01 for pH calibration. All new units being shipped will now have this new firmware version installed on them. If your instrument has a lower serial number, or an earlier version of firmware, it will set the pH 4 reference to 4.01 as usual.
SO2 Questions
I added the right amount of sulfite to my wine but the numbers are still low!
This is a common occurrence with several explanations, any or all of which may be happening:
Make sure you are using fresh sulfite powder. Potassium metabisulfite degrades over time and that stuff you bought 2 years ago is probably bad now!
Make sure that you stir your wine thoroughly when you add sulfite. If you pour a 10% solution of KMBS into your wine, it sinks like a battleship! A sample taken off the top will read low unless the wine is stirred.
A significant portion of the sulfite you added may have ended up ‘bound’, particularly if your free SO2 was very low to begin with. This bound SO2 does not show up when you measure free SO2, and it is not protecting your wine. You will need to add more sulfite until your free SO2 comes up to the right level. Sometimes you must add 2 or even 3 times more sulfite than you first calculated.
How does the Vinmetrica SC-100 (or SC-300) compare to other methods?
Vinmetrica’s SC-100 (and SC-300) gives results that are right in line with aeration oxidation (AO) and segmented flow analysis:
Also check out Dan Pambianchi’s article “Benchmarking of SO2 Analysis Instruments and Methods” on the Home Winemaking Resources page of the Techniques in Home Winemaking website:
For SO2 measurements with the SC-300 or the SC-100A, there are several quick tests you can do to make sure the instrument is not faulty.
First, if your instrument does not have the latest firmware version 1.1.2, 3.1.2, or 3.2.d, we recommend that you always start with the electrode disconnected. After powering on the instrument (and, on the SC-300, pressing ENTER to confirm SO2 mode), then connect the SO2 electrode. This avoids incorrect background settings that may make the instrument appear to be insensitive or unresponsive. To determine which firmware version you have, go into Test Mode (see Appendix A in your manual, or HERE)
To test the functioning of the instrument:
1. Be sure the battery is good per the manual’s instructions.
2. Remove the electrode to expose the BNC connector at the back of the instrument. Turn on the instrument and select SO2 mode. Short out the terminals on the connector, using a paper clip or similar metal piece to touch the center pin of the connector to its outer metal sheath. The device should indicate “STOP” with its red LED and buzzer or beeper. If this does not happen there may be a problem with the instrument; contact us for more information.
3. Connect the electrode and put it in about 20 mL of distilled water; add about 1 ml (half a bulb squeeze) of each of the acid solution and the reactant and swirl in the usual way keeping constant motion. The instrument may or may not indicate STOP as above. If it does not, add a drop of the SO2 Titrant solution. This should make the STOP condition occur. [If it doesn’t you may have an electrode problem read in the next section below how to fix this.] Now add one drop of a concentrated sulfite solution (1-10% is fine) and verify that the STOP signal ends and the PROCEED light illuminates. If this happens, your electrode is probably OK as well.
4. Finally, you can check your SO2 reagents with the SO2 Standard Test.
Preconditioning of the electrodeNote: as of October 2013, all SO2 electrodes are shipped pre-conditioned, so this procedure should not normally be needed. Sometimes when the SO2 electrode is first shipped it can be shipped “hot”. A hot electrode is one that is overly sensitive as indicated by high readings (and STOP conditions) when inserted into solutions that should be giving no signal, like pure water or water plus reactant and acid with a drop of 10% KMBS added. If your electrode shows this behavior, it generally can be fixed by pre-conditioning as follows:
1. First, turn the power on and press the MODE button until the instrument is in SO2 mode, then press ENTER. Attach the SO2 electrode to the SC-300 analyzer. Put 20 mL of distilled water (deionized water) in a beaker and add half a bulb squeeze of the acid solution, half a bulb squeeze of the reactant solution and let the SO2 electrode sit in this solution.
2. Then add one drop of 10% potassium metabisulfite solution (KMBS) to the beaker with the electrode in it. Swirl gently. The instrument LCD should now read 0.0 (in units of nanoamps) or close to it. If it is reading significantly higher than 20 on the screen, let the electrode sit in the solution for half an hour.
3. After half an hour rinse the electrode with distilled water. Put it in about 20 mL of distilled water. Again add half a bulb squeeze of each of the acid solution and the reactant and swirl in the usual way keeping constant motion. The instrument may or may not indicate STOP as above. If it does not, add a drop of the SO2 Titrant solution. This should make the STOP condition occur. [If it doesn’t you may have an electrode problem]
4. Now add one drop of KMBS solution (1-10% is fine), swirl and verify that the STOP signal ends and the PROCEED light illuminates. If this is the case, your electrode has been conditioned. If the electrode is still “hot” and the PROCEED light does not illuminate, let it sit in 20 mL of distilled water with a half bulb full of the acid solution for a few hours. Now repeat the test from step 3. If it works, great! If not, call us and we will try to troubleshoot or replace your electrode. Our contact information is at the bottom of the page.
Can I conserve SO2 or TA Titrant by placing unused solution back into its respective bottle?
We don’t recommend it because if you cross-contaminate any of the solutions you can cause yourself a major headache in trying to untangle crazy results. But yes, you can do this to save your Titrants but always make sure you are putting it back in the correct bottle.
My SO2 reactant solution and SO2 acid solution have both turned yellow or burnt orange. What happened?
This is most likely an issue with contamination. If they are severely contaminated, the Acid and Reactant will need to be replaced.
It is normal if the Reactant solution has a slight yellow tinge but that typically happens over the course of a few years. The Acid should stay clear. The Acid solution can turn yellow if trace iron gets into it (which is not a problem usually) , or possibly if the Reactant solution comes in contact with it (which can be a problem). Also, the chemical composition of the Reactant is such that it can sometimes develop that yellow color. [If you want to send us a photo so that we can verify this, we would be more than happy to take a look at it. You can send it to info@vinmetrica.com.]
Also, the two squeeze bulb pipettes that are provided in the kit should be marked for either the Acid or the Reactant and used only on their specified solution.
How do I know if I am purchasing the correct termination for my SO2 electrode?
We have created this handy Electrode_Guide to guide you in selecting the correct SO2 electrode. Remember, you are selecting the SO2 electrode termination so find the picture of the instrument that matches your instrument and select the electrode that matches up to it.
What are the SO2 Acid, SO2 Reactant, and SO2 Titrant made of?
Our SO2 Reactant and SO2 Titrant are proprietary solutions. The SO2 Acid Solution is 2 molar (2M, or about 6% by weight) hydrochloric acid (HCl).
I accidentally added way too much Potassium Metabisulfite (KMBS) to my must/wine sample due to a miscalculation on our part. When I perform the SO2 titration I have to use more than a full syringe (5mL) of the SO2 Titrant to get a reading. What can I do? What should I do?
When testing for Free SO2, if you follow the procedures in the normal way and you end up using 5mL + 2.6mL more from a second syringe then your calculation at the end would not need to change. You would simply multiply total volume by 20 as stated in the manual, which would be 7.6*20 = 152
If you know you have high SO2 values and you want to use less of your SO2 Titrant (to conserve your reagents) you can use 10mL of your wine, add 15mL of DI water and then follow the remaining steps as usual, adding your Reactant and Acid solutions and titrating with the SO2 Titrant. This procedure would change the formula you use to calculate your ppm of SO2. Using the large formula for calculating Free SO2 content, listed in the manual (currently on page 6 of the SC-100A manual) your value for ‘S’ would change to 10mL of your wine sample (where normally this is 25mL). And then you can proceed with the calculation of the equation. You will not be able to simply use the 20*V calculation.
Here is the full equation: ppm SO2 = (64*V*N*1000)/2*S (listed in the manual)
For example: If you use a 10mL wine sample (S), perform the test and you use 3.5 mL of your SO2 Titrant (V), the equation would look like this:
*When adding DI water to your wine sample, do not worry. This will not affect your SO2 values. Adding this water allows you to bring up your sample volume to a more manageable volume but will not affect your SO2 readings.
Very high alcohol levels may change the response of the system somewhat. The boiling step generally reduces levels far enough to limit this problem. For very high alcohol levels, you can dilute the wine in distilled water to bring the concentration below 10% ABV.
High free SO2 levels (>30ppm) may impact the Biopressure agent. Again, boiling will help this, but if needed you can dilute the wine sample as above.
What if I let the incubation period go for longer than 45 minutes? Is my sample no longer good?
Timing in this step is not critical but needs to be as close to the 45 minute mark as possible. Accuracy of the technique may be affected by letting the reaction go for excessive periods of time.
My instrument does not return to 0.0 after releasing a sample vial; or, little to no response is seen on inserting a vial into the assembly; or a response is low and steadily increasing over the course of a few seconds.
Check to be sure the insertion needle is not plugged or partially obstructed.
a) Disconnect the needle assembly as shown in Figure 2 of the manual.
b) Draw back the plunger of the 5 mL syringe and connect the needle assembly to the syringe end.
c) Push the syringe plunger to force obstructing material out of the needle. Check for free flow by suspending the needle in water while pushing the plunger. A steady stream of bubbles should flow easily out the end of the needle. You can order replacement needle/assemblies from Vinmetrica (part number SC-50-15).
The values drift up or down when reading a vial
a) It is normal for values to decrease slowly; that is why we recommend taking the initial highest value.
b) If values keep increasing past about 5 seconds after the insertion event, take a reading at the same time point (15-20 seconds later) for all samples.
What is the effect of temperature on the MLF assay?
Temperature can have a significant effect on the assay. The recommended temperature is standard room temperature, or about 70 °F (21°C). Temperatures within 3 degrees °F (or 1.5 °C) of this value should be fine. At lower temperatures, the rate of the Biopressure reaction slows down, and the pressure change also is lower, just like car tires lose pressure in cold temperatures. Therefore the assay is less sensitive at lower temperatures.
At higher temperatures, the opposite effect occurs: the reaction will go faster and generate higher values. In principle this is not bad per se – the assay becomes slightly more sensitive with the higher pressures generated. There is nothing wrong with using a higher temperature up to about 95°F (35°C), with two cautions: 1. the higher pressure resulting from higher temperatures may throw off the instrument’s 50 nA set point so it now will signal at a level below the 0.1 g/L level – therefore you will have to pay attention to concentration calculations; 2. most users’ environments aren’t set up to control higher temperatures that well, so increased variability may result. A warm water bath with controlled temperature can be used.
When I run the MLF Assay, on average, how much of the wine sample should be left after heating it in the microwave?
After heating your wine sample for 90 seconds, as instructed in the manual, your sample should have approximately 7 to 8 ml of wine remaining.
Be sure and let it cool completely before bringing the volume back up to 10 mL!
Is it possible to use the Vinmetrica SC-50 for analyzing MALIC ACID levels on grapes (pre-harvest grape sampling), besides using it later for MLF assessment?
Absolutely!
ABV Questions
Can you use your ABV Assay kit to test Vinegar?
Yes! Though you will need to edit the calculations slightly.
Take a 1.0 ml sample instead of the usual 0.10 ml for wine analysis. The rest of the assay is carried out as usual. The final result [%ABV = (Vb – Vs)* 2.88] is divided by 10 because you took 10 times more sample.
Sentia Questions
How do I connect my Sentia device to a wireless network?
Sentia Wifi connection
To connect your Sentia device to a wireless network, follow these steps:
From the Home screen, touch the SETTINGS button, then touch Connectivity to navigate to the Connectivity screen
Touch Wi-Fi Settings to get to the Wi-Fi Settings screen
Turn on Wi-Fi and press
Select a network from underneath the CHOOSE A NETWORK panel and enter the Wi-Fi password (if prompted)
After the connection is established, press to confirm your selection
To stop the analyzer trying to connect to a previously connected network, select Known networks on the Connectivity screen, then select the network by name and touch the rubbish bin icon.
Note: The Sentia analyzer only supports 2.4 GHz Wi-Fi (channels 1 to 11). Routers using 5 GHz or 2.4 GHz channel 12 are NOT compatible with Sentia analyzers.
If you continue to have problems, change Wi-Fi signals to a network which has fewer other device connections (such as a mobile phone hotspot).
What is the current Sentia software version?
As of March 1, 2023:
Current Software Version: 2.2.0.460
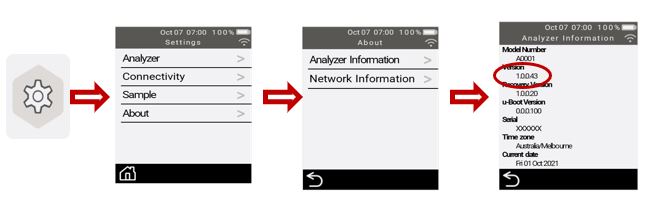
How to locate software information on your Sentia device:
1. On your analyzer, tap Settings on the Home screen.
2. Tap About
3. Tap Analyzer Information
4. The software version that you are currently running is located on the Analyzer Information screen under Version.
Please ensure that you are always running the most up to date software version available. Details on how to update your software version are providedhere.
How do I update my Sentia software version?
A step-by-step guide for updating software.
Connect device to a power source.
Connect deviceto internet. The Sentia analyzer can only check for software updates when connected to internet (via Wi-Fi).
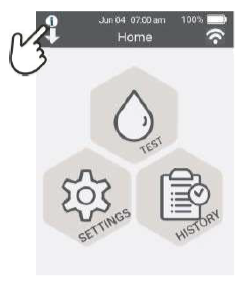
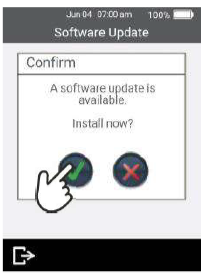
If a software update is available, an “i” for install will appear on the device Home screen, top left-hand side. *
Touch the “i” icon and permit the new update by pressing
* Note: upon Wi-Fi connection it may takeyour device some time to recognize that a new software version has become available.
How do I do a hard shutdown of my Sentia device?
A step-by-step guide to completing a hard shutdown on your Sentia™ device
Turn on the device and do not connect it to power.
Hold the off button until the screen goes black (approximately 10-20 seconds).
Note: ignore the prompt“Power Down?” from the device to shut down the device (do not press the tick, keep holding down the off button).
When the screen goes black, release your finger from the on/off button.
You may now turn it on again.
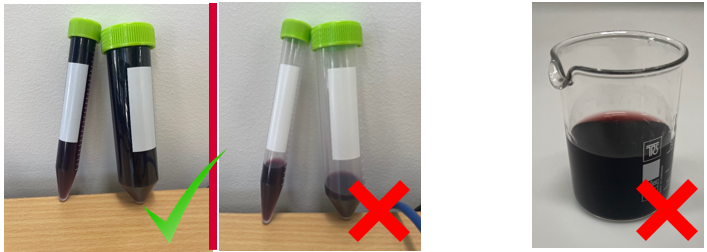
How do I take a proper wine sample?
Wine sampling tips for the generation of accurate results on your Sentia™
Good sampling technique is important for achieving accurate results on the Sentia. To collect a well representative sample of your wine, follow the below tips:
Collect your sample from a homogenous area, i.e., the middle of a barrel, tank or bottle; do not skim the top or bottom.
Degas carbonated samples *
Do NOT hold samples in your pipette, or an alternative transfer vessel, for any extended period of time. It is recommended that samples be tested as soon as possible post-collection; immediately for free sulfur dioxide (FSO₂) testing.
* Note: Heavy degassing procedures are not applicable to FSO₂ samples.
How to prepare a grape juice sample using the Sentia system?
Best practice for obtaining your grape juice sample from the vineyard.
To obtain a good grape juice sample – as representative of a final must as possible – follow the below steps:
DO collect a decent sized number of FRESH grapes for juicing (with clean hands) – 100 recommended where possible, to be taken from multiple bunches, top/middle/bottom. Remove stem and leaf matter.
DO collect grape bunches from randomized locations within the vineyard for best representation of your overall harvest.
DO sample in the cool of the morning, before any moisture stress occurs.
DO NOT collect grape bunches from exterior vineyard rows (border rows or end vines) or from other sites with unusual features. E.g., rocky or poor drainage areas. This will minimize the risk of contaminated or skewed results.
DO NOT collect grape bunches from any diseased or damaged plants.
Crush sampled grapes in a zip-lock bag (double-bagging is a good idea to avoid any leakage issues).
Test juice as soon as possible (or refrigerate*). Do not leave juice to ferment as this will impact your results.
* Long term refrigeration is not recommended; 1-2 days storage is acceptable.
Tips for using a micropipette
How to get the most out of your micropipette
The micropipette, if used correctly, is a fabulous tool for taking small volumes with great accuracy. For best technique, consider the following tips:
Make sure your pipette is in good condition, and gets regularly calibrated (refer to your owner’s manual for suggested time intervals)
Choose the right pipette for the right job. E.g. For the Sentia device, a 100-1000 µl (0.1 mL – 1 mL) micropipette is adequate for the volume range to be covered. DO NOT use a pipette past its volume limits.
DO use the correct pipette tips for your device and avoid roughly jamming them onto the pipette tip cone. Jamming tips on can break the shaft.
DO keep your pipette clean to avoid contamination issues. Most pipettes can be cleaned externally with typical laboratory cleaning agents, soap or alcohol (refer to your owner’s manual).
Learn your plunger stops and good technique (stop 1 is used for aspiration/uptake and stop 2 for dispensing). *
Practice using your pipette, ideally on water, prior to a first-time testing event.
Validate the result via an alternative method. This can be done in-house or externally via the use of a commercial laboratory.
Measure an in-house wine “standard” of known concentrationon Sentia – e.g., a wine sample that is part of an organized proficiency program.
Things to remember if comparing results with another laboratory and/or method:
Different methods will always give slightly varying results due to different error margins.
For an accurate comparison, the User MUST sample from the same aliquot originally tested.
Why are my Sentia malic acid results not what I expected?
How to troubleshoot malic acid result issues
Malic Issues
Possible cause one:
Ensure you are conducting the sample dilution step correctly. The dilution should be conducted with a volumetric pipette, and always follow a 1:4 dilution ratio with the Sentia™ malic acid buffer. The analysis should be conducted within 30 minutes of diluting the sample.
Possible cause two:
The malic acid buffer and/or strips are out of date or have been compromised. Ensure that they are in date and have been stored correctly (2°C – 8°C/35.6°F – 46.4°F, with lids closed).
Possible cause three:
The customer is running on an old version of software which is no longer compatible for malic acid analysis. See our current software version here.
Customers can check their current software by navigating to Settings > About > Analyzer Information. The software version number is listed under “version”.
Possible cause four:
Your reference method data is incorrect, as opposed to your Sentia data. Recheck your reference method result, and/or employ a different check method for comparisons.
How do I prepare a wine sample for fructose analysis?
A step-by-step guide for analyzing fructose on the Sentia™
To test for fructose on the Sentia you will need to dilute your sample 1:4 (1 part wine: 4 parts fructose buffer).
Equipment and solutions required:
Sample (wine)
Sentia Fructose Buffer (diluent)*
1 x small, clean vial
Micropipette
2 x clean micropipette tips
Dilution instructions:
1. Using a micropipette with clean tip, accurately pipette 400µl (your 4-parts) Sentia™ fructose buffer into a clean vial.
2. Dispose of the used tip and replace.
3. Accurately pipette 100 µl (your 1-part) wine sample to same vial.
4. Dispose of pipette tip.
6. Cap vial and gently shake to mix (highly carbonated samples may need a de-gassing step)
7. You now have a diluted wine sample ready to use. (Note: samples can be diluted for up to 30 minutes prior to testing)
8. Dispose of waste wine and buffer solutions down the sink with running water.
* Alternative buffers should NOT be used. Please also refrain from combining buffer solutions from different bottles to avoid changes in the buffer concentration and check expiry dates before use.
The glucose strips are out of date or have been compromised. Ensure that they are in date and have been stored correctly (2°C – 8°C/35.6°F – 46.4°F, with lids closed).
Excessive CO₂ present in sample. All samples with visible effervescence should be degassedprior to testing. If not degassed, bubbles can cause sample-electrode contact issues and lead to erroneous results.
Possible cause three:
Sample excessively high in glucose, far exceeding the measuring range of 0.1 – 10 g/L. This test is designed for dry style wines as they near fermentation end. Testing samples with extreme sugar levels can lead to erroneous results.
Fructose Issues
Possible cause one:
The fructose buffer and/or strips are out of date or have been compromised. Ensure that they are in date and have been stored correctly (2°C – 8°C/35.6°F – 46.4°F, with lids closed).
Note: excessive CO₂ for fructose samples can also impact upon dilution accuracies. CO₂ can displace sample in a transferal process, leading to lower than required volumes being aliquoted.
Possible cause three:
As per above for Glucose, cause three (fructose with same measurement range).
Possible cause four:
The sample dilution step is not being completed correctly. The dilution should be conducted with a volumetric pipette, and always a 1:4 dilution ratio with the Sentia fructose buffer. The analysis should be conducted within 30 minutes of diluting the sample.
How do I prepare a wine sample for malic acid analysis?
A step-by-step guide for analyzing malic acid on the Sentia™
To test for malic acid on the Sentia you will need to dilute your sample 1:4 (1 part wine: 4 parts malic acid buffer).
Equipment and solutions required:
Sample (wine)
Sentia Malic Buffer (diluent)*
1 x small, clean vial
Micropipette
2 x clean micropipette tips
Dilution instructions:
1. Using a micropipette with clean tip, accurately pipette 400 µl (your 4-parts) Sentia malic buffer into a clean vial.
2. Dispose of the used tip and replace.
3. Accurately pipette 100 µl (your 1-part) wine sample to same vial.
4. Dispose of pipette tip.
6. Cap vial and gently shake sample (highly carbonated samples may need a de-gassing step)
7. You now have a diluted wine sample ready to use (Note: samples can be diluted for up to 30 minutes prior to testing)
8. Dispose of waste wine and buffer solutions down the sink with running water.
Alternative buffers should NOT be used. Please also refrain from combining buffer solutions from different bottles to avoid changes in the buffer concentration and check expiry dates before use.
How to ensure accurate free sulfur dioxide results
Tips for getting an accurate free sulfur dioxide reading on the Sentia™
Sentia User’s must be mindful that free sulfur dioxide (FSO₂) is a highly volatile compound, sensitive to oxygen and oxygen binding events. This means that FSO₂ samples need to be collected with particular care and tested rapidly for best results.
Collect a decent sized sample; DO NOT transfer/apply miniscule or bubbled volumes to your Sentia device. Over aerated samples can lead to lower than true figures.
Test FSO₂ samples IMMEDIATELY post-collection where possible.
If you cannot test your FSO₂ sample immediately (or you’re conducting a comparison with another FSO₂ method), store the sample in a sealed vessel containing little to no air until use.
DO NOT test FSO₂ with the Sentia device (or any other device) immediately after making any SO₂/PMS additions to your wine. The wine will need at least 24 hours after a dosing event to settle and re-stabilize before testing.
DOT NOT test FSO₂ on highly carbonated samples.
Figure 1. Dos & don’ts for FSO₂ sample collection.
Figure 2. Dos & don’ts for FSO₂ sample storage.
How do I degas a highly carbonated sample?
Sentia™ degassing instructions
Highly carbonated samples may require a small degassing step prior to testing.
The sample should be placed into a small container and shaken vigorously for ≥ 20 seconds to displace gas. Ensure that the sample container is only filled up part way to allow for sufficient agitation.
Consider further degassing measures if results are not as expected.
Note: It is NOT recommended to degas samples prior to Free sulfur dioxide (FSO₂) analysis. Highly carbonated samples are not suitable for FSO₂ testing on the Sentia.
YAN Questions
When the YAN test is completed and the neutralizer is added does this make the YAN test safe to dump down the drain or do we still have to dispose of it in a special manner?
We always recommend checking your local regulations as they vary depending on where you are.
The small amount of formaldehyde in a YAN test is neutralized entirely by following the procedure in the manual, and since the pH of the solution should be less than 9 at that point, there should be no problem in sewering the test’s contents.
Services Page FAQs
Vinmetrica Labs Quality Guarantee
We offer quality laboratory testing for brewers and winemakers. We believe our clients should be guaranteed that their samples are handled with the utmost care and to the highest standards. Our laboratory services will be performed following the rigorous AOAC and TTB approved wine and beer analysis methods.
We try to minimize our changes in price for our laboratory services as much as possible. But the laboratory service prices can vary from time to time depending on the time of the year. All reports are strictly confidential and are meant for client’s use only. Our prices on our website reflect our up to date pricing.
Note: We are not responsible for wine samples that are improperly packaged, damaged or deteriorated during their shipment. Please contact us if you have any questions or concerns regarding shipping and handling. Our contact email: info@vinmetrica.com and our technical support and sales phone number is (760) 494-0597.
Beverage Sample Shipping Preparation
Shipping Preparations for Beverage Samples
Note: We recommend that you do not ship samples on Friday or Saturday as the samples could be compromised over the weekend due to deterioration of the sample. If shipping Thursday, make sure to ship via overnight, so the samples do not sit over the weekend.
1. Upon receiving your Vinmetrica Labs sample shipping kit, please place the gel pack in the freezer for 12 hours or until the gel pack is frozen solid.
2. Prepare the sample by filling up either the 15 mL or 50 mL conical tube then cap and seal tightly. Look on the Vinmetrica Labs Label for a Min. Volume necessary for that specific test. Note: Fill the conical tube to a level above the beginning of the threads near the top of the tube to reduce headspace. (this is a volume either over 15mL or 50 mL depending on the size of the tube)
3. Fill out the Vinmetrica Labs label that is provided. Check the box for the test that you wish to be performed on your sample. Please include a phone number and an email address on one of the labels. Place the label on the tube so the label is not overlapping itself. Note: One analysis per tube. Please only check one box per conical tube. Analyses require a certain volume which will be either the 15 mL, 50 mL or 100 mL Min. Volume category. For 100 mL analyses, please fill two 50 mL conical tubes as per the instructions above.
4. Repeat steps 2 and 3 for all sample analyses ordered.
5. Place the samples in the ziploc bag provided and seal shut. Place the ziploc bagged samples and the frozen gel pack into the styrofoam box.
6. Place the prepared styrofoam box into the cardboard box that is provided. Tape and seal the box closed. Print out a shipping label addressed to us (our address is below) and please write on the label, in a conveniently readable location, “For Laboratory Analysis Only”.
Note: The shipping supplies are provided free of charge. Expect arrival in 3-4 business days for handling and delivery of the supplies.
For Local Drop-off
If you are near North County San Diego, feel free to stop by and drop off your sample Monday through Friday 9-5pm. Our address is:
Do you have a question that we haven’t answered here?
Not a problem, type it in below!
Specifications
SC-100A & the SC-100
Sensitivity: detects less than 2 ppm Free or Total SO2 in a 25 mL sample
Accuracy: +/- 2 ppm Free or Total SO2
SC-200
pH range: 1.0 to 13.
Accuracy: better than 0.02 pH unit.
Autocalibrate on pH 3.00, 4.01, 7.00, 10.00
TA mode: Accuracy: +/- 0.2 g/L Tartaric acid.
Sensitivity: Detects down to 0.2 g/L Tartaric Acid
SC-300
Combines the specs for the SC-100 and SC-200
SC-50
Sensitivity: better than 0.04 g/L malic acid (3 mL sample)
39 thoughts on “Frequently Asked Questions”
John Hawker
1) When I turn on my SC-55 meter, it reads 0.02 kPa. Is this normal? is there any way to zero the meter?
2) When I run Free and Total SO2 tests, the results show a wide disparity. My latest test results showed 9 for Free SO2 and 58 for Total SO2. Am I doing something incorrectly? Could these results be accurate? If so, what should I do about the high Total SO2 levels?
John, you can zero your SC-55 as it says in the manual on page 4 under “Instrument Operation”:
“4. The DIF button puts the device in differential mode, subtracting the current reading from all
subsequent ones. You can use this to “zero” your instrument if you want”
WRT free vs. total SO2, it is quite normal to get higher results for total SO2, so I don’t think you have a problem here (except that the free SO2 of 9 ppm probably means you need to add more sulfite.). As long as total SO2 stays below 350 ppm, it is considered safe.
Hello! I am calculating total acidity in hard cider. I’d like to show the results in g/L of malic acid. I’ve read the above instructions for additional calculations and wanted to make sure I have it correct. So, I use the basic formula V*0.133*75/S & multiply the resulting number by 67/75 to get g/L malic acid.
Is this correct? I think an example would be helpful.
(I am referring to the first question under pH/TA questions)
Thank you!
Kelly, yes that is correct. Or, if you used the default TA Titrant (0.133N NaOH) and a 5.0 mL sample, you can just multiply the TA value from the simple equation (TA = 2 x V ) by the factor 67/75. Example: you titrated a 5.0 mL cider sample and it took 4.0 mL of TA Titrant. The simple equation comes out TA = 2 x 4.0 = 8.0 g/L tartaric. In terms of malic acid, it then would be 8.0 x 67/75 = 7.1 g/L malic acid.
-Rich
The best way to store the pH electrode is, of course, in Electrode Storage Solution. But yes, the electrode can be left in wine or water for over 30 minutes at a time. It can also be left out on the bench for 30 minutes or so. However, you want to avoid letting it get too dry, and prolonged storage in water or wine may change the calibration; so if you want to leave it out of its storage solution for 5 hours, I suggest you remove it from wine samples and let it set on a clean paper towel with an occasional re-wetting from a container of pure water. A few drops every 30 minutes is sufficient. I suggest you re-check the calibration once during this 5-hour period of time.
Hello there- I own the SC-300 analyzer and testing the solution in a couple barrels being stored. Is SO2 and ph the two tests I should be monitoring? And what is the target levels I should be keeping them at? Thank you.
Jeana,
Thank you for reaching out to us. For your bulk aging wines, we recommend testing for Free SO2 regularly and making any necessary adjustments. If you have a stabilized value for your pH (say you have been testing it over the past couple of months and its staying relatively constant) you don’t need to test for pH every single time you test for SO2. Once we determine that our Free SO2 levels are stable we typically test and adjust them about every 3-4 weeks. You can follow whichever guidelines you prefer but we typically aim for 0.8 molecular in our whites and 0.5 molecular in our reds (some will even use 0.4 molecular for their reds).
Here is one of our older blogs about your sulfite results and what to do with them. You will need to know your pH to make your sulfite adjustments so make sure to have that value before testing for SO2.
Let us know if you have any other questions.
Taylor
I have a first generation sc-100 that I purchased in March of 2012. (Unit #414!) The panel no longer registers accurate numbers but the “stop” light and the beep when the so2 titration is complete still work fine.
Does my unit need a firmware upgrade or more than that alone. I would like to confirm before I send it back for servicing.
Greg A
Pottstown, PA
Greg,
Thank you for being a long time customer. Unit 414! That is impressive. The LCD screen sounds like it needs to be replaced. Unfortunately I am not sure we have any of those screens in stock for repairs as the unit was phased out so long ago. If the stop light and the beep still work fine and you are still able to do the titrations successfully, without overshooting the endpoint, an LCD screen replacement may not be necessary. Since you have so many years of experience with the unit you might be able to continue using it even without the screen as the numbers on the screen aren’t totally necessary for your SO2 calculations.
If you would like to send it in for an LCD screen replacement we may need to order the part which could take a while to get to us, if they even make the screen any more. I would be happy to look in to this further and email you with our findings. There are no firmware upgrades available for your unit.
Let us know if you have any additional questions.
Taylor
The LCD display is a 0-20V, 3-1/2 digit unit like this one: https://www.newark.com/jewell-modutec/bl130303u/voltage-meter/dp/90F9686
You’d probably have to crimp a new header on the wires (or try soldering them to the pins, or soldering the wires to the wires on the old header), but then you just unplug the old one and plug the new one into the circuit board. Unfortunately newark shows this as out of stock, but they’re out there.
Robert,
Yes you can use the SC-300 to determine total acidity in vinegar. Assuming it is a typical acid strength of 5%, that would be 50 mL/L as acetic acid, which is the same as 50 g/liter (density of acetic acid liquid is 1.0). So, 50 g/L divided by 60 g/mol acetic acid means it would be about 0.83 mol/L acetic acid. In 1.0 mL then there would be 0.83 mmol of acetic acid. This would take 0.83/0.133 or about 6.2 mL of the TA Titrant (which is 0.133 mmol/mL) to titrate completely.
So: 1. measure out as precisely as possible 1.00 mL of your vinegar into a small beaker or other titration vessel
2. add about 20 mL of distilled or deionized water.
3. Attach and Insert the pH electrode (it’s a good idea to calibrate it ahead of time). Begin gentle stirring or swirling
4. put your SC-300 in TA mode and titrate with TA Titrant per the usual method to pH 8.2; record the mL of TA Titrant used as ‘V’.
5. calculate % acetic acid by volume as
100% * V * 0.133 * 60 [mg or uL acetic acid] / 1000 [uL solution, i.e. the 1.0 mL sample]
Let us know if you have any questions.
Rich
For titratable acid measurement the Vinmetrica SC-300 user manual (V 3.0 b) notes for a 5 ml wine or must sample that you add 15 mL DI. And also notes that you can add up to 15 mL additional DI to raise the liquid level to accommodate the pH probe. Does the formula for using 15 mL of DI and 5 ml wine / must (TA = V * 0.133 * 75/S) change if using 30 mL of DI vs. just 15 mL of DI?
Michael,
The short answer is no, the formula doesn’t change. This is because distilled water doesn’t have any TA, and the dilution by water is irrelevant to the calculation in this procedure.
Let us know if you have any additional questions.
Taylor
Hello,
I’m a first time user of your wine testing services and I have already received your supply pack. I will be requesting 3 of the same test for 3 different vintages that I have. Do I order those 3 tests at your website first, then send in my 3 separate samples? Will your test lab know that I’ve paid for the 3 tests and will apply those purchased tests to each sample received?
I just want to make sure I understand your process.
Scott,
Thank you for the inquiry. Our apologies for the delayed response, we were closed for the holidays. For future reference, you can do this either way. You can order the tests online ahead of time or you can send in your samples and we will bill you when the work is complete. As long as you fill out the labels that were provided with your lab services starter pack completely, we can usually link your name to your order. Otherwise we will reach out to you for payment.
We have your samples now and are running the analysis. You should hear from us later on today with your results.
I purchased the SC300 Pro kit, and can not tighten the plastic burette holder onto the stand. I am assuming that I slide the holder over the stand and turn the screw cap to tighten, but it doesn’t close tight enough. Am I missing something?
Susan,
We are sorry to hear you are having issues with your SC-300 Pro Kit. It might be best if you can send us some pictures so we can see what is going on. I can email you separately so that you have my contact information.
Taylor
Hi, I am using the SC100 for about the last 2 years to test for free SO2. After I add the 2 reagents to the 25ml’s of wine I power up the meter and if it reads zero I know I will not get a reading after titration. The meter seems to need to have numbers when I turn the meter on, then I power off and then back on to get a zero then it will read a titration. Is this the norm? I have recently also needed to also take the wire connectors out of the meter and then move the wires around to find the right spot in order for a reading, if I don’t it reads zero but then I start the titration and use all of the titrate and do not get a reading. I know that monthly 10ppm of SO2 is about 4 grams for a barrel so I use that as a guide so I think when I finally get a reading and the wine has used up close to the 10 ppm SO2, we are in the ball park. Any ideas with the connections and readings? I think there is a poor connection but not sure how to fix other than replace or move around. Once it seems to read ok I have been able to get the other 5 barrels analyzed. But I usually have to mess around for a half hour or so to get it to go? Please advise and thanks.
Robert,
It sounds like there could be a bad connection somewhere. Is this a new issue you are seeing or one that has been happening for a while? Have you looked at our Troubleshooting Guide under our Support tab? It can walk you through several steps to help determine what might be happening. If you think it is simply a wire/connection issue it will probably need to come in for repair and diagnostics. If the Troubleshooting Guide doesn’t help, please give our Tech Support line a call (760-494-0597) and we can give you some additional advice or give you an RMA number to send the unit and electrode in.
Thank you for reaching out to us. We will work to get this resolved quickly for you.
Taylor
While measuring free so2, after adding acid reagent and reactant to my 25 ml sample, my reading started at 50 add then dropped to 0. I only added 2 cc and it stayed above 100. What should I do next?
Mark,
Thank you for reaching out to us. The initial reading of 50 that then drops down to 0 is okay. It can happen sometimes and does not indicate that anything is wrong.
Just to confirm, you added 2mL of your SO2 Titrant during the titration of your sample? Or two drops of SO2 Titrant? If you only added two drops of your SO2 Titrant, this indicates that you have little to no SO2 in your wine sample. If you reached the endpoint after adding 2mL of the SO2 Titrant then you would take that value, 2 and multiply it by 20 to get your ppm SO2 in your wine sample.
Make sure that you are constantly swirling your wine sample after adding the Acid and Reactant and during the time you are titrating the SO2 Titrant. Add the SO2 Titrant dropwise until you reach your endpoint. We have a quick how to video on our website or you can visit the Troubleshooting Guide which walks you through many SO2 testing scenarios.
Let us know if you have additional questions or need more help. Your can also call our tech support line.
Gary,
Thank you for the inquiry. If you are NOT located in California, after you input your shipping address and select your state, the sales tax will disappear.
Taylor
I have ran the ABV test 3 times now and never get to the olive green color. ?? My samples after 24 or even 12 hours all have a blue tint before the test starts.???
Hi, you are probably pipetting the wine sample incorrectly, adding too much. Read over the instructions in the manual for details on using the micropipettor to deliver 100 microliters precisely. Call my direct office line 760-494-0597 x 102 and we can walk through it.
Ken,
We are glad to hear your SC-300 is working great for you. At this time we have no plans to offer an in-home VA test kit. The chemicals are quite noxious. We do offer VA testing through our Lab Services though.
Thanks for the inquiry.
Taylor
Hi, couples questions here. Interested to use the S02 test on bottled cocktails and other also carbonated beverages. Will it be possible to take readings of bottled cocktails(spirit + citrus + sugar + water) and/or other carbonated beverages(sparkling wine/sparkling cocktails/etc.?)
Jonathan,
Thank you for contacting us. Yes, our SO2 analyzer can be used to test carbonated beverages. However, since you mentioned that there is citrus in these drinks you may have some issues depending on how much ascorbic acid is in your cocktail. If your ascorbic acid levels are significant then you can run in to some issues. If you suspect your ascorbic acid levels are low, we can provide you with a quick procedure to adjust for this. I think it may be best if you contact our Technical Support, either info@vinmetrica.com or 760-494-0597, and we can go over the specific requirements for your sample.
Thank you
Taylor
I have the SC-100 instrument, which reaches the stop condition but then gives a reading that jumps around, even showing 0.00 in the process. I have yet to run the tests suggested – “For SO2 measurements with the SC-300 or the SC-100A, there are several quick tests you can do to make sure the instrument is not faulty.”
What is likely the problem and how should I attempt to remedy it?
Thanks, Jim Benn
Jim,
You may want to try cleaning your electrode by soaking it in your acid solution for about 30 minutes then gently scraping at those two platinum wires to remove any deposits. It is possible your electrode could be dirty. After cleaning, I suggest you try the “Reagent Test” for the SO2 function. The instructions for this test can be found on the Troubleshooting Guide. If you hover over the Support tab, the Troubleshooting Guide should be listed at the top. Give the reagent test a try and let us know how it goes. There are also some other tests there you can try that will help us determine what might be going wrong with your instrument, if anything.
Let us know if you have any questions.
Taylor
Hi,
I am a homebrewer looking into the SC-200 for testing pH and TA of my sour beers during the brewing process. I see that the SC-200 is labeled as a Wine Analyzer Kit, and refers to Tartaric Acid in subsequent text. Will it be able to test pH and TA of beer given the expected byproduct of lactic acid?
Thanks,
Brian
yes you can do pH and TA on beer with the SC200. The pH is independent of the beverage or whatever solution it’s measuring. The TA is also; it’s just a matter of how you calculate the final answer. Wine TA is usually reported as tartaric acid but the titration actually measures acidity as equivalents per liter (eq/L). If you assume the acid is mostly tartaric (true for wine) then you use the conversion factor for tartaric acid (75), as we do in our kit. For a sour beer you would use the factor for lactic acid (90). So you could just convert as:
g/L lactic = 90/75 * g/L tartaric.
I have SC-300 that will not go to CAL mode. CAL flashes briefly and that’s it. The unit cycle through like it in testing mode and I don’t believe it’s calibrating
Alonzo,
I think it would be best if you contacted our Tech Support line, 760-494-0597. Its probably best if we walk through the diagnostics over the phone.
Thanks
Taylor
Question on using transfer pipettes to obtain the 25mL sample for titration. I understand that the pipettes come in a sealed sterile package. Are these pipettes intended to be used only once – or can they be sterilized and reused? If so – what is the recommended process for cleaning and/or sterilization? I usually sanitize anything that comes into contact with the wine with Starsan. If I clean the transfer pipette with Starsan and then use it to obtain a wine sample for titration – will it impact the SO2 (or other) results? Thanks!
Jeff,
Great question! These pipettes are to be used multiple times. No need to purchase tons of them. We recommend the following procedure. When getting ready to take your 25mL sample for testing, rinse the pipette with DI water then use a 70% ethanol spray to clean the pipette. (remember not to use a sulfite solution here because that will throw off your sulfite readings!) Spray the pipette and wipe down with a clean paper towel. Take your sample and perform your SO2 test. Before you move on to the next sample, spray the pipette again with ethanol and wipe down. Some customers also rinse the inside with DI water again before spraying the ethanol but that is not necessary. I am unfamiliar with Starsan but if it is a common “food safe” sterilant (that does not contain sulfite) it should be okay.
Let us know if you have any other questions.
Taylor
 to confirm your selection


1) When I turn on my SC-55 meter, it reads 0.02 kPa. Is this normal? is there any way to zero the meter?
2) When I run Free and Total SO2 tests, the results show a wide disparity. My latest test results showed 9 for Free SO2 and 58 for Total SO2. Am I doing something incorrectly? Could these results be accurate? If so, what should I do about the high Total SO2 levels?
John, you can zero your SC-55 as it says in the manual on page 4 under “Instrument Operation”:
“4. The DIF button puts the device in differential mode, subtracting the current reading from all
subsequent ones. You can use this to “zero” your instrument if you want”
WRT free vs. total SO2, it is quite normal to get higher results for total SO2, so I don’t think you have a problem here (except that the free SO2 of 9 ppm probably means you need to add more sulfite.). As long as total SO2 stays below 350 ppm, it is considered safe.
Hello! I am calculating total acidity in hard cider. I’d like to show the results in g/L of malic acid. I’ve read the above instructions for additional calculations and wanted to make sure I have it correct. So, I use the basic formula V*0.133*75/S & multiply the resulting number by 67/75 to get g/L malic acid.
Is this correct? I think an example would be helpful.
(I am referring to the first question under pH/TA questions)
Thank you!
Kelly, yes that is correct. Or, if you used the default TA Titrant (0.133N NaOH) and a 5.0 mL sample, you can just multiply the TA value from the simple equation (TA = 2 x V ) by the factor 67/75. Example: you titrated a 5.0 mL cider sample and it took 4.0 mL of TA Titrant. The simple equation comes out TA = 2 x 4.0 = 8.0 g/L tartaric. In terms of malic acid, it then would be 8.0 x 67/75 = 7.1 g/L malic acid.
-Rich
vinmetrica sc-300 pH electrode, proper handling of pH electrode.
how long can it to be outside of the solution?
While using the pH meter can it stay inside of wine or water for more than 5 minutes?
If I’m testing wine for 5 hours can the electrode stay in the wine for so many hours?
Specifically asking for vinmetrica sc-300 ph electrode.
The best way to store the pH electrode is, of course, in Electrode Storage Solution. But yes, the electrode can be left in wine or water for over 30 minutes at a time. It can also be left out on the bench for 30 minutes or so. However, you want to avoid letting it get too dry, and prolonged storage in water or wine may change the calibration; so if you want to leave it out of its storage solution for 5 hours, I suggest you remove it from wine samples and let it set on a clean paper towel with an occasional re-wetting from a container of pure water. A few drops every 30 minutes is sufficient. I suggest you re-check the calibration once during this 5-hour period of time.
Hello there- I own the SC-300 analyzer and testing the solution in a couple barrels being stored. Is SO2 and ph the two tests I should be monitoring? And what is the target levels I should be keeping them at? Thank you.
Jeana,
Thank you for reaching out to us. For your bulk aging wines, we recommend testing for Free SO2 regularly and making any necessary adjustments. If you have a stabilized value for your pH (say you have been testing it over the past couple of months and its staying relatively constant) you don’t need to test for pH every single time you test for SO2. Once we determine that our Free SO2 levels are stable we typically test and adjust them about every 3-4 weeks. You can follow whichever guidelines you prefer but we typically aim for 0.8 molecular in our whites and 0.5 molecular in our reds (some will even use 0.4 molecular for their reds).
Here is one of our older blogs about your sulfite results and what to do with them. You will need to know your pH to make your sulfite adjustments so make sure to have that value before testing for SO2.
Let us know if you have any other questions.
Taylor
I have a first generation sc-100 that I purchased in March of 2012. (Unit #414!) The panel no longer registers accurate numbers but the “stop” light and the beep when the so2 titration is complete still work fine.
Does my unit need a firmware upgrade or more than that alone. I would like to confirm before I send it back for servicing.
Greg A
Pottstown, PA
Greg,
Thank you for being a long time customer. Unit 414! That is impressive. The LCD screen sounds like it needs to be replaced. Unfortunately I am not sure we have any of those screens in stock for repairs as the unit was phased out so long ago. If the stop light and the beep still work fine and you are still able to do the titrations successfully, without overshooting the endpoint, an LCD screen replacement may not be necessary. Since you have so many years of experience with the unit you might be able to continue using it even without the screen as the numbers on the screen aren’t totally necessary for your SO2 calculations.
If you would like to send it in for an LCD screen replacement we may need to order the part which could take a while to get to us, if they even make the screen any more. I would be happy to look in to this further and email you with our findings. There are no firmware upgrades available for your unit.
Let us know if you have any additional questions.
Taylor
The LCD display is a 0-20V, 3-1/2 digit unit like this one: https://www.newark.com/jewell-modutec/bl130303u/voltage-meter/dp/90F9686
You’d probably have to crimp a new header on the wires (or try soldering them to the pins, or soldering the wires to the wires on the old header), but then you just unplug the old one and plug the new one into the circuit board. Unfortunately newark shows this as out of stock, but they’re out there.
Question: Can I use my SC300 to determine acid level in vinegar? If so how? Thanks.
Robert,
Yes you can use the SC-300 to determine total acidity in vinegar. Assuming it is a typical acid strength of 5%, that would be 50 mL/L as acetic acid, which is the same as 50 g/liter (density of acetic acid liquid is 1.0). So, 50 g/L divided by 60 g/mol acetic acid means it would be about 0.83 mol/L acetic acid. In 1.0 mL then there would be 0.83 mmol of acetic acid. This would take 0.83/0.133 or about 6.2 mL of the TA Titrant (which is 0.133 mmol/mL) to titrate completely.
So: 1. measure out as precisely as possible 1.00 mL of your vinegar into a small beaker or other titration vessel
2. add about 20 mL of distilled or deionized water.
3. Attach and Insert the pH electrode (it’s a good idea to calibrate it ahead of time). Begin gentle stirring or swirling
4. put your SC-300 in TA mode and titrate with TA Titrant per the usual method to pH 8.2; record the mL of TA Titrant used as ‘V’.
5. calculate % acetic acid by volume as
100% * V * 0.133 * 60 [mg or uL acetic acid] / 1000 [uL solution, i.e. the 1.0 mL sample]
Let us know if you have any questions.
Rich
For titratable acid measurement the Vinmetrica SC-300 user manual (V 3.0 b) notes for a 5 ml wine or must sample that you add 15 mL DI. And also notes that you can add up to 15 mL additional DI to raise the liquid level to accommodate the pH probe. Does the formula for using 15 mL of DI and 5 ml wine / must (TA = V * 0.133 * 75/S) change if using 30 mL of DI vs. just 15 mL of DI?
Michael,
The short answer is no, the formula doesn’t change. This is because distilled water doesn’t have any TA, and the dilution by water is irrelevant to the calculation in this procedure.
Let us know if you have any additional questions.
Taylor
Hello,
I’m a first time user of your wine testing services and I have already received your supply pack. I will be requesting 3 of the same test for 3 different vintages that I have. Do I order those 3 tests at your website first, then send in my 3 separate samples? Will your test lab know that I’ve paid for the 3 tests and will apply those purchased tests to each sample received?
I just want to make sure I understand your process.
Please let me know.
Thanks,
Scott
Scott,
Thank you for the inquiry. Our apologies for the delayed response, we were closed for the holidays. For future reference, you can do this either way. You can order the tests online ahead of time or you can send in your samples and we will bill you when the work is complete. As long as you fill out the labels that were provided with your lab services starter pack completely, we can usually link your name to your order. Otherwise we will reach out to you for payment.
We have your samples now and are running the analysis. You should hear from us later on today with your results.
Taylor
I purchased the SC300 Pro kit, and can not tighten the plastic burette holder onto the stand. I am assuming that I slide the holder over the stand and turn the screw cap to tighten, but it doesn’t close tight enough. Am I missing something?
Thanks
Susan,
We are sorry to hear you are having issues with your SC-300 Pro Kit. It might be best if you can send us some pictures so we can see what is going on. I can email you separately so that you have my contact information.
Taylor
Hi, I am using the SC100 for about the last 2 years to test for free SO2. After I add the 2 reagents to the 25ml’s of wine I power up the meter and if it reads zero I know I will not get a reading after titration. The meter seems to need to have numbers when I turn the meter on, then I power off and then back on to get a zero then it will read a titration. Is this the norm? I have recently also needed to also take the wire connectors out of the meter and then move the wires around to find the right spot in order for a reading, if I don’t it reads zero but then I start the titration and use all of the titrate and do not get a reading. I know that monthly 10ppm of SO2 is about 4 grams for a barrel so I use that as a guide so I think when I finally get a reading and the wine has used up close to the 10 ppm SO2, we are in the ball park. Any ideas with the connections and readings? I think there is a poor connection but not sure how to fix other than replace or move around. Once it seems to read ok I have been able to get the other 5 barrels analyzed. But I usually have to mess around for a half hour or so to get it to go? Please advise and thanks.
Robert,
It sounds like there could be a bad connection somewhere. Is this a new issue you are seeing or one that has been happening for a while? Have you looked at our Troubleshooting Guide under our Support tab? It can walk you through several steps to help determine what might be happening. If you think it is simply a wire/connection issue it will probably need to come in for repair and diagnostics. If the Troubleshooting Guide doesn’t help, please give our Tech Support line a call (760-494-0597) and we can give you some additional advice or give you an RMA number to send the unit and electrode in.
Thank you for reaching out to us. We will work to get this resolved quickly for you.
Taylor
While measuring free so2, after adding acid reagent and reactant to my 25 ml sample, my reading started at 50 add then dropped to 0. I only added 2 cc and it stayed above 100. What should I do next?
Mark,
Thank you for reaching out to us. The initial reading of 50 that then drops down to 0 is okay. It can happen sometimes and does not indicate that anything is wrong.
Just to confirm, you added 2mL of your SO2 Titrant during the titration of your sample? Or two drops of SO2 Titrant? If you only added two drops of your SO2 Titrant, this indicates that you have little to no SO2 in your wine sample. If you reached the endpoint after adding 2mL of the SO2 Titrant then you would take that value, 2 and multiply it by 20 to get your ppm SO2 in your wine sample.
Make sure that you are constantly swirling your wine sample after adding the Acid and Reactant and during the time you are titrating the SO2 Titrant. Add the SO2 Titrant dropwise until you reach your endpoint. We have a quick how to video on our website or you can visit the Troubleshooting Guide which walks you through many SO2 testing scenarios.
Let us know if you have additional questions or need more help. Your can also call our tech support line.
How do I apply my Texas tax exempt certificate to eliminate sales tax from my order?
Gary,
Thank you for the inquiry. If you are NOT located in California, after you input your shipping address and select your state, the sales tax will disappear.
Taylor
I have ran the ABV test 3 times now and never get to the olive green color. ?? My samples after 24 or even 12 hours all have a blue tint before the test starts.???
Hi, you are probably pipetting the wine sample incorrectly, adding too much. Read over the instructions in the manual for details on using the micropipettor to deliver 100 microliters precisely. Call my direct office line 760-494-0597 x 102 and we can walk through it.
Hi, have had my SC-300 for several years, it’s great. Will you be offering a test for volatile acidity for the SC-300?
Ken,
We are glad to hear your SC-300 is working great for you. At this time we have no plans to offer an in-home VA test kit. The chemicals are quite noxious. We do offer VA testing through our Lab Services though.
Thanks for the inquiry.
Taylor
Hi, couples questions here. Interested to use the S02 test on bottled cocktails and other also carbonated beverages. Will it be possible to take readings of bottled cocktails(spirit + citrus + sugar + water) and/or other carbonated beverages(sparkling wine/sparkling cocktails/etc.?)
Jonathan,
Thank you for contacting us. Yes, our SO2 analyzer can be used to test carbonated beverages. However, since you mentioned that there is citrus in these drinks you may have some issues depending on how much ascorbic acid is in your cocktail. If your ascorbic acid levels are significant then you can run in to some issues. If you suspect your ascorbic acid levels are low, we can provide you with a quick procedure to adjust for this. I think it may be best if you contact our Technical Support, either info@vinmetrica.com or 760-494-0597, and we can go over the specific requirements for your sample.
Thank you
Taylor
I have the SC-100 instrument, which reaches the stop condition but then gives a reading that jumps around, even showing 0.00 in the process. I have yet to run the tests suggested – “For SO2 measurements with the SC-300 or the SC-100A, there are several quick tests you can do to make sure the instrument is not faulty.”
What is likely the problem and how should I attempt to remedy it?
Thanks, Jim Benn
Jim,
You may want to try cleaning your electrode by soaking it in your acid solution for about 30 minutes then gently scraping at those two platinum wires to remove any deposits. It is possible your electrode could be dirty. After cleaning, I suggest you try the “Reagent Test” for the SO2 function. The instructions for this test can be found on the Troubleshooting Guide. If you hover over the Support tab, the Troubleshooting Guide should be listed at the top. Give the reagent test a try and let us know how it goes. There are also some other tests there you can try that will help us determine what might be going wrong with your instrument, if anything.
Let us know if you have any questions.
Taylor
Hi,
I am a homebrewer looking into the SC-200 for testing pH and TA of my sour beers during the brewing process. I see that the SC-200 is labeled as a Wine Analyzer Kit, and refers to Tartaric Acid in subsequent text. Will it be able to test pH and TA of beer given the expected byproduct of lactic acid?
Thanks,
Brian
yes you can do pH and TA on beer with the SC200. The pH is independent of the beverage or whatever solution it’s measuring. The TA is also; it’s just a matter of how you calculate the final answer. Wine TA is usually reported as tartaric acid but the titration actually measures acidity as equivalents per liter (eq/L). If you assume the acid is mostly tartaric (true for wine) then you use the conversion factor for tartaric acid (75), as we do in our kit. For a sour beer you would use the factor for lactic acid (90). So you could just convert as:
g/L lactic = 90/75 * g/L tartaric.
I have SC-300 that will not go to CAL mode. CAL flashes briefly and that’s it. The unit cycle through like it in testing mode and I don’t believe it’s calibrating
Alonzo,
I think it would be best if you contacted our Tech Support line, 760-494-0597. Its probably best if we walk through the diagnostics over the phone.
Thanks
Taylor
Question on using transfer pipettes to obtain the 25mL sample for titration. I understand that the pipettes come in a sealed sterile package. Are these pipettes intended to be used only once – or can they be sterilized and reused? If so – what is the recommended process for cleaning and/or sterilization? I usually sanitize anything that comes into contact with the wine with Starsan. If I clean the transfer pipette with Starsan and then use it to obtain a wine sample for titration – will it impact the SO2 (or other) results? Thanks!
Jeff,
Great question! These pipettes are to be used multiple times. No need to purchase tons of them. We recommend the following procedure. When getting ready to take your 25mL sample for testing, rinse the pipette with DI water then use a 70% ethanol spray to clean the pipette. (remember not to use a sulfite solution here because that will throw off your sulfite readings!) Spray the pipette and wipe down with a clean paper towel. Take your sample and perform your SO2 test. Before you move on to the next sample, spray the pipette again with ethanol and wipe down. Some customers also rinse the inside with DI water again before spraying the ethanol but that is not necessary. I am unfamiliar with Starsan but if it is a common “food safe” sterilant (that does not contain sulfite) it should be okay.
Let us know if you have any other questions.
Taylor