For Vinmetrica SC-100A, SC-200 and SC-300
The topics in our troubleshooting guide refer to the methods in the Vinmetrica manuals. For current versions of the instructions for pH, TA, and SO2 tests refer to your manual, or here: https://vinmetrica.com/manuals/
Please click on the links in the text to navigate our troubleshooting guide step-by-step
My problem is related to:
1. pH
2. TA
5. Other Instrument malfunction
Whatever issues are occurring, always do the following first:
1. Make sure the batteries are good. If you’re seeing “Lo Bat” on the display, replace the batteries.
2. Inspect the pH electrode. The probe’s immersible end has a glass bulb as the pH sensor. Ensure it is intact and not shattered, and free of visible deposits; it should appear as shown below:
|
|
|

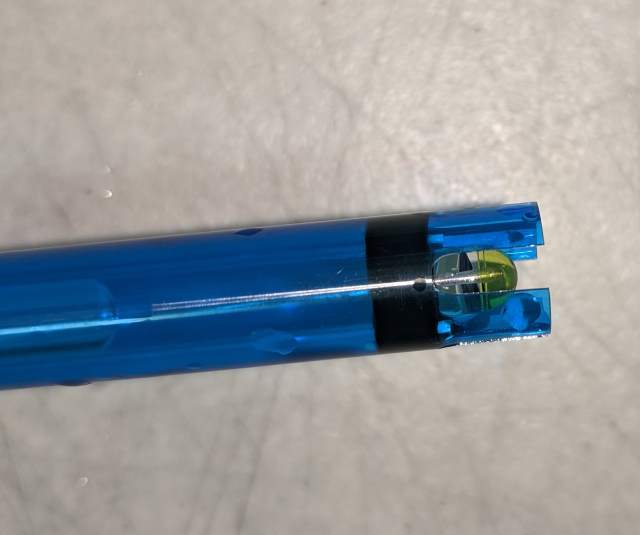
If the electrode appears dirty, try to clean and/or recondition it.
3. Be sure the pH electrode has been stored at least 24 hours in a proper electrode storage solution (Vinmetrica’s product is 2M potassium chloride in 50 mM potassium hydrogen phthalate; other similar products may be used). The entire bottom 1 inch of the electrode needs to have been submerged for at least 24 hours. If this has NOT happened, it’s best to wait until it has! The reference junction needs to be in contact with the storage solution when not in use in order to maintain its reference potential.
4. If the instrument has firmware version 3.2.d (2.2.d for SC-200) or higher, or 3.0.6 (2.0.6 for SC-200) or higher, perform a pH calibration reset in Test Mode. Exit Test Mode and try to calibrate again if possible.
My pH problem is
1. Can’t calibrate properly
NOTE: We now recommend performing calibration and measurements without constant stirring; immerse the electrode with a quick stirring motion, then let it sit still in the liquid. This produces the most repeatable measurements, especially with the newer style electrodes.
A. Calibrates at pH 7.00, but not at 4.00 (4.01)
i. 4.01 reference solution reads between 3.5 and 4.5, but Cal LED never flashes
If you haven’t already, do a pH Calibration Reset (pH CalRst) in Test Mode.
Try to repeat calibration at 4.00
If 4.00 now reads above 4.50, there is offset error and calibration will not proceed; go to offset error if you have firmware version 3.1.1 or higher
ii. Reads around 7 no matter what solution the probe is in.
1. Probe pH sensor glass bulb broken? Re-check.
If bulb is broken, replace the pH probe.
2. Electrical short in probe, connector, or instrument
Remove probe. Put instrument in CAL mode.
a. pH goes low or high (towards 1 or 13)
Do the short out test on the pH connector
Test Passed: instrument OK, probe shorted; replace probe
Test failed: internal Open circuit; contact Tech Support
b. pH stays at 6.5 to 7.5 with nothing attached:
instrument connector, or internal, short. Contact Tech Support
B. Calibrates at neither pH
i. If you haven’t already, do a pH Calibration Reset (pH Cal Rst) in Test Mode.
ii. pH 4.01 reads outside the range 3.5 to 4.5 but within the range 3.0 to 5.2 and/or
pH 7.00 reads outside the range 6.5 to 7.5 but within the range 6.0 to 8.2:
1. go to offset error if you have firmware version 3.1.1 (2.1.1) or higher.
2. Contact Tech support if you can’t do the above step.
2. I can calibrate, but the results are unexpected or varying
A. Check your calibration with the cream of tartar test
i. If this test passes, your instrument and electrode and solutions are apparently OK
ii. Cream of tartar test gives pH values that way exceed the normal range (less than pH 3.30 or more than pH 3.80): you may have a miscalibration at pH 4.
(1) If you can, check the voltage of the pH electrode in pH 4.00 and 7.00. If 7.00 shows a mV value in the normal range (Table 1), but 4.01 is coming out more than 195 mV above, or less than 140 mV above the pH 7 value, then your pH 4.01 reference solution is likely contaminated with acid or alkali. Replace it.
(2) If pH reference solutions are giving proper mV values, try a CAL reset followed by another calibration.
B. pH response seems to drift
i. Be sure electrode has been in electrode storage solution 24 hours.
ii. Be sure to re-check calibration
iii. Be sure all reference solutions, samples, and electrode are at the same temperature when calibrating and measuring
iv. Try cleaning the electrode
C. pH results differ from those reported by a lab, or measured on a different pH meter
i. pH values determined by two competent, properly calibrated pH meters should agree to within 0.05 pH units or better.
ii. If this is not the case, recheck calibration and cream of tartar test
iii. Remember to keep solutions as close as possible to same temperature as reference solutions.
return to pH problems Back to Top
___________________________________________________________________________
Offset error in pH or CAL mode: Electrode or instrument error
If potential mode is available (firmware 3.1.1 and higher), follow the steps below.
Check the voltage of the pH electrode in pH 4 and pH 7 reference solutions. On the newer versions of our instrument’s firmware (version X.1.1, X.1.2 x.1.3, or X.2.d or e, where X = 2 for an SC-200 and X=3 for an SC-300) you can check the raw voltage coming out of the pH probe. You can also check these values on a good laboratory pH meter if it has a potential (mV or millivolt) mode. A good electrode should have +5 to -15 mV at pH 7 and at least an additional 160 mV on top of this pH 7 value at pH 4.00 (e.g., 165 to 145, resp.).
Note: do not check the voltage of a pH electrode with a voltmeter! You will get meaningless results, because even very good voltmeters do not have the necessary high input impedance to accurately measure a pH electrode’s voltage.
a) Put the instrument into Potential Mode (push the Mode button once when in pH mode); now the pH LED blinks.
b) Rinse the pH electrode and place it in the pH 7.00 reference solution.
c) Write down the mV reading on the LCD screen once it stabilizes. On instruments with FW version 3.1.1 through 3.1.4, a negative mV value is indicated by the red STOP LED illuminating.
d) Repeat steps a. and b. using the pH 4.00 reference solution.
On Table 1 below are shown acceptable values for the pH 4.00 responses for a particular pH 7.0 value, assuming an acceptable slope is 59.2 mV/pH +/- 102/95% at 25°C. If your electrode is falling outside of these ranges, and/or if its response time is very slow (>30 seconds to reach within 0.02 of final value), you should try to clean and/or recondition it. If these steps do not restore proper function, replace the electrode.
Table 1. Acceptable mV responses in potential mode for pH electrodes, at T = 20C. Values in red are marginal.
|
Measured pH 7 value, mV |
Ideal pH 4.00 mV value |
Lower OK pH 4.00 mV value (95% slope) |
Upper OK pH 4.00 mV value (102% slope) |
|
-20 |
158 |
148. |
161. |
|
-15 |
163 |
153. |
166. |
|
-10 |
168 |
158. |
171. |
|
-5 |
173 |
163. |
176. |
|
0 |
178 |
168. |
181. |
|
5 |
183 |
173. |
186. |
|
10 |
188 |
178. |
191. |
If mV readings are OK, offset error is probably due to bad bias voltage. Try resetting the pH DAC
return to pH problems Back to Top
___________________________________________________________________________
How to do a pH Calibration Reset. This resets your instrument’s pH calibration parameters to default settings.
1. Enter Test Mode (see Appendix A of your SC-200 or SC-300 manual, or go to https://vinmetrica.com/manuals/to get the latest version.)
a. turn off the instrument.
b. Now press and hold down the POWER button about 2-3 seconds, then release it. You should now see the firmware version number, like 3.1.2 or 3.2.d. The latest version is 3.2.F, or 3.1.4 on older models.
c. If you’re working on an SC-200, the firmware version number will look like 2.1.2 or 2.2.d; the latest version is 2.2.F, or 2.1.4 on older models.
2. Press the POWER button briefly 12 times to get to module 13, “pH CAL reset”. The message “PrESS EntEr” scrolls across the screen.
3. Press the ENTER button. Verify that the instrument beeps and the message “Good cal Rst” scrolls across the screen.
4. Exit Test Mode by holding down the POWER button until the instrument shuts off.
return to pH problems Back to Top
___________________________________________________________________________
If the electrode appears to be normal per Table 1, there may be an instrument issue known as “pH bias error” that’s preventing calibration. You can try adjusting this bias with the “set pH DAC” section (#14) in Test Mode (firmware versions 3.2.d or higher and 3.1.2 or higher). This changes the pH Bias in an attempt to bring the pH response into reference range. See Appendix A, Section 14 in the manual for more information.
1. Enter Test Mode: turn on the instrument holding down the POWER button until the firmware version is displayed, then immediately release the button). If you haven’t done so already, it’s a good idea to do a pH Cal Reset before proceeding.
2. Scroll through the sections of Test Mode by briefly pressing the POWER button. Pressing it 13 times from the first section should bring you to section 14.
3. Section 14 will show a message “set pH DAC”, then will cycle between two numbers, a voltage number like 2.23, followed by an integer whose default value is 16. This integer is the “pH DAC Index”.
4. Pressing “Enter” will raise the pH DAC Index value which will lower the apparent pH value. Pressing the “Mode” button does the opposite. So if, as is most common, your calibration values are too high (like 4.6 in pH 4 reference solution), you’ll want to press ENTER. You’ll see the pH DAC Index increase to 17.
5. Exit Test Mode: hold down the POWER button again until the instrument shuts off.
6. Now try your normal calibration.
If adjusting the pH DAC Index up or down two steps (i.e. from 16 to 18 or to 14) does not bring the calibration values into line, there is a likely an “impedance problem”. Contact Tech Support.
return to pH problems Back to Top
___________________________________________________________________________
Slow response or drifting values – cleaning and/or reconditioning
Remember that your electrode needs to have been in proper storage solution for at least 24 hours for proper equilibration of the reference junction.
Note: Avoid touching the electrode’s glass bulb! Use a vigorous stream of water to rinse any residues off.
Cleaning the pH electrode: An electrode that is difficult to calibrate, or that is very slow in response time (or “drifting”) can sometimes be reinvigorated by
cleaning. Try the following steps in the order given:
1. Shock treatment in acid and alkali. Place the electrode in 2 M HCl (this is the“Acid Solution” of the SO2 reagents set) and let it sit for 5 minutes with
occasional stirring. Then remove it and rinse with water, followed by 5 minutes in 0.1 to 1 M NaOH (the TA Titrant or 1N NaOH), or 10 g/L soda ash (sodium carbonate) also with some stirring. Remove and rinse, then place in electrode storage solution for at least 1 hour before trying to use it again. If this isn’t showing improvement, go to the next step.
2. Soak electrode in hot (NOT boiling!) water, about 60 °C, for 10 mins. Allow to cool to room temperature then rinse and place in pH 4 reference solution for 5 minutes. Try to re-calibrate. If this does not work, try the next step.
3. Place electrode in electrode storage solution (from Vinmetrica, or 2M KCl with optionally added 0.01M potassium acid phthalate, KHP) at 60 °C and allow electrode and solution to cool to room temperature, then rinse and place in pH 4 reference solution for 5 minutes. Try to recalibrate. If this does not work, try the next step.
4. Soak electrode for 15 minutes in a 1:10 dilution of bleach in a 0.1 % solution of lab (“Alconox” ) or liquid detergent in hot water with occasional vigorous stirring. Rinse with DI water, then place in pH 4.00 reference solution for 5 minutes. Try to re-calibrate.
return to pH problems Back to Top
___________________________________________________________________________
Cream of tartar calibration test:
A quick way to check your calibration and pH accuracy is to measure the pH of a saturated solution of cream of tartar which has a pH of 3.56 at 25 degrees Celsius:
1. Get pure cream of tartar (grocery store stuff is fine, provided it’s pure), or reagent grade potassium hydrogen tartrate, also known as potassium acid tartrate or potassium bitartrate. Call it KHT for short.
2. Place about 1/8 teaspoon of KHT in 20 mL of distilled water. Mix well for about 30 seconds. You want to be sure the solution is saturated, i.e., everything that can dissolve, has dissolved. There should be some undissolved solid left.
3. Decant or filter the solution off the solids if possible.
4. This solution has a standard pH of 3.56 at 25 degrees C (78 degrees F). It should be within 0.02 pH of this value at temperatures from 20 to 30 degrees Celsius. We usually are OK with a value between 3.50 and 3.60. Discard after 24 hours
return to pH problems Back to Top
___________________________________________________________________________
Most TA problems have to do with pH performance problems, so be sure you are getting good calibration settings with your pH function. Assuming that is the case, the remaining issues are largely around expected values and have to do with operating errors in the sampling or in the titration part of the test.
1. TA values don’t agree with expectations or with a reference lab’s values.
2. Getting highly variable TA numbers on the same sample.
3. Can one use different sodium hydroxide solutions rather than the Vinmetrica TA Titrant?
- TA values don’t agree with expectations or with a reference lab’s values:
a. Be sure to de-gas your sample, because dissolved CO2 will increase the apparent TA value, sometimes significantly (e.g. still wines can have CO2 concentrations around 0.5 – 1 g/L, equivalent to 0.8 to 1.7 g/L TA) and this is not want you want in your TA value.
Follow instructions in the manual for taking and preparing the wine sample.
b. By default, Vinmetrica’s equipment titrates to pH 8.2 for a TA value. Some labs may use a titration to pH 7.0, which will result in a lower number. [You can set your instrument to indicate the TA endpoint at pH 7.0 by going into Test Mode; see Appendix A in the instrument manual]
c. Be sure you are using Vinmetrica’s TA Titrant (0.133N NaOH). If you are using something else, see below
2. Getting highly variable TA numbers for the same sample:
a. Be sure that you are operating and reading your TA Titrant dispenser (syringe or buret) correctly. If you’re using a 5 mL syringe, be sure that bubbles aren’t present in the filled syringe before you start. Expel these. If you’re using a buret, be sure there’s no air bubble in the buret’s tip, as this can suddenly dislodge and cause error in the measurement of the volume. For either dispenser, be sure you read the starting and ending volume numbers correctly. Refer to your manual for directions
b. Be sure you aren’t overrunning the titration endpoint. You should slow down your titration to one drop at a time when you reach near 1 pH unit of the final value (i.e. 8.2, so slow down at 7.0). If your final pH endpoint is more than 0.3 above the correct value (i.e., you ended up at pH 8.5 vs the 8.2 you were shooting for), then you will get a higher than expected TA value and you may want to repeat that test.
3. Can one use different sodium hydroxide solutions rather than the Vinmetrica TA Titrant?
Yes. Vinmetrica’s TA Titrant is 0.133 M (molar, or N normal) sodium hydroxide (NaOH). Commonly, one finds 0.10 or 0.20 N sodium hydroxide available. If you use one of these, then correct your TA value by the factor N/0.133. For example, if you use 0.20N NaOH and it takes 2.5 mL to titrate 5 mL of wine to the endpoint, then you would multiply our usual calculation (2 x vol) by the factor 0.20/0.133:
Corrected TA value = 2 x 2.5 x (0.20/0.133) = 7.5 g/L as tartaric
return to pH problems Back to Top
___________________________________________________________________________
Whatever problems you are having, check these items FIRST
1. Make sure the batteries are good. If you’re seeing “Lo Bat” on the display, replace the batteries.
2. Make sure the SO2 electrode is being plugged into the correct receptacle on the instrument. Occasionally someone puts the electrode in the wrong place. This is possible on some units because we have gone through three iterations of SO2 electrode plugs over the years. Check this link to get a view of the correct plug/receptacle combinations:
My SO2 problem is
1. No apparent response – the instrument stays low, or on 0.0 all the time during a titration
a. Double check that you used the reagents & instrument correctly:
i. Mix 25 mL wine, 2 mL SO2 Reactant (yellow dot), 2 mL SO2 acid solution (red dot)
ii. Attach SO2 electrode to proper connector; put instrument in SO2 mode
iii. Titrate with SO2 Titrant (blue dot)
b. Do the liquid SO2 test
i.ii. Liquid test is OK: Perhaps you have high free SO2, or ascorbic acid in your wine?
1. If your sample contains fruit or juice from something other than grapes, you may be seeing interference from ascorbic acid (vitamin C). Certain berries, persimmons, citrus fruits of course, and other fermentables, may contain high levels of ascorbic acid which acts like free SO2 in the Vinmetrica test. Check here for information on how to test for this.
2. To test for high free SO2, run the SO2 test again, this time on diluted wine:
3. take 10 mL wine and add 15 DI water and re-test.
4. If a response is seen within 5 mL of Titrant, you have high free SO2 (calculate value in usual way then multiply by 2.5)
ii. Liquid test fails: do the short out test on the SO2 connector; check plug connection; check electrode wires for cleanliness.
1. Short out test passed: There is an apparent problem with SO2 electrode
a. Check cleanliness of SO2 electrode
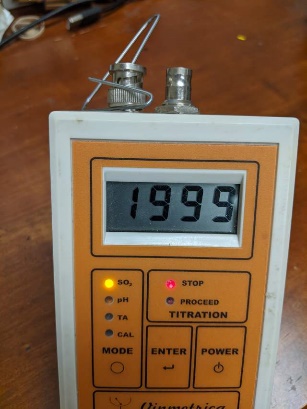
b. Check continuity of electrode: attach electrode, put instrument in SO2 mode and carefully short out the platinum wires with metal paper clip or other metal device. You should see a strong response, up to 1999 and STOP conditions
c. If a. and b. fail to restore or demonstrate function, your electrode may have an intermittent response
d. If a. and b. and c. fail to restore response, replace SO2 electrode
2. Short out test failed: there is an instrument malfunction; contact Tech Support
2. Response occurs right away, before starting the titration in SO2 mode
a. I get 1999 and STOP before even connecting the SO2 electrode!
Instrument short: contact Tech Support
b. I get 1999 and STOP after connecting the electrode but before putting it in a solution!
SO2 electrode short: probably replace electrode, but contact Tech Support
c. I added Acid and Reactant reagents to the wine sample; when I put the electrode in the sample, it went to a STOP condition without adding any SO2 Titrant
Most likely this is indicating that your free SO2 is less than 1 ppm
ii. Rule out hot electrode or high reagent blank
3. Intermittent SO2 response: While it is normal for the instrument to respond briefly during a titration up until the endpoint is reached, a poor connection between the SO2 probe and the instrument can produce a STOP signal that jumps up and down (typically from 0.0 to several hundred and back in two seconds or less) even when no SO2 Titrant is being added. This can sometimes be induced by jiggling the lead or by wiggling the connection on the instrument. In this case, you are already past the endpoint; you missed it because of an intermittent connection. Follow the steps below to see if it can be simply fixed:
a. Check that the receptacle on the instrument is tightly in place. 1) On older style SC100s, SC-100As and SC-300s there is a single female BNC receptacle for the electrodes. It should be firmly in place, not loose and possible to turn. If it is loose, you can open up the instrument and tighten the nut that holds it in place. Contact us for help if you need to. 2) On some SC-300s up until about 2014, there are separate receptacles for the pH and SO2 probes, with the latter being an RCA (stereo-type) connector. Again, open up the instrument and tighten it as above if needed. Contact us for help if you need to. 3) On modern (post-2014) SC-300s and SC-100As, the receptacle is a male BNC-style connector. Note that its knurled outer knob is freely rotating, but its central shaft should be firmly held to the instrument. If the instrument is past its 2-year warranty, you can open up the instrument and tighten it as above if needed. Contact us for help if you need to.
b. Most often, intermittent behavior is due to poor contact between the mating surfaces on the probe’s connector and receptacle. First, be sure that all mating surfaces are clean and free of corrosion. Clean them with wire brush or similar tool if needed and remove any residue with compressed air or careful wiping. Second, for female BNC connectors, the gold-colored receiver in the center of the white insulator can become “sprung” with repeated connections; in that case it no longer makes good contact with the gold pin of the mating piece. This receiver is actually a cylinder comprising four semi-circular sections that you can discern if you look closely.
Use the corner of a flat-blade screwdriver to slightly push one or two of these sections toward the center of the hole, thereby enabling better contact with the pin of the mating piece.

Similarly, if you have an RCA-style connector on your probe, the outer grounding ring on it can become sprung. Use a pair of pliers or similar tool to deform the grounding ring into a slightly oval shape.


c. Use the Liquid SO2 Test to see if performance is restored
d. To minimize intermittent behavior, leave probes connected to the instrument rather than repeatedly removing and reattaching them. The only exception is for pre 2014 SC-100As (FW version 1.0.1) and SC-300s with a single connector (FW version 3.0.2 or earlier). These require removal of the SO2 probe before power-up.
e. Contact us at Vinmetrica if you have any questions.
4. I only added 1 or 2 drops of SO2 Titrant before the STOP condition occurred
a. Most likely this is indicating that your free SO2 is less than 1 ppm
i. if you think your free SO2 really is higher than this, rule out high reagent blank
b. See “SO2 questions” [I added the right amount of sulfite to my wine but the numbers are still low!] under
5. SO2 values don’t agree with expectations or with a reference lab’s values:
a. Make sure your equipment passes the Liquid SO2 Test
b. If your numbers appear lower than expected, see “SO2 questions” [I added the right amount of sulfite to my wine but the numbers are still low!] under
c. If the numbers are higher than expected, double check the titration on a smaller volume of wine
d. If you want to verify your SO2 test you can try the SO2 standard test
return to SO2 problems Back to Top
___________________________________________________________________________
1. Place 25 mL distilled water in beaker
2. Add 1 mL SO2 Acid Solution and 1 mL SO2 Reactant
3. Attach SO2 electrode, turn on instrument in SO2 mode, press ENTER if requested.
4. Place SO2 electrode in beaker and stir/swirl
a. Instrument should read 0.0 or a low value (less than 50); green PROCEED light is on.
b. If STOP light is on, go to Hot SO2 electrode or high reagent blank
5. Add 1 or 2 drops of the SO2 Titrant. Solution should turn slightly yellow. If not, add 1-2 more drops. If still no yellow, check your reagents.
a. Instrument should read above 100; red STOP light on, beeper sounding
b. If not, add 1-2 more drops SO2 Titrant
c. If still not, go back and try the next step (liquid test fails)
return to SO2 problems Back to Top
___________________________________________________________________________
Hot SO2 electrode or high reagent blank:
1. add 1 drop 1.0% KMBS (e.g. 0.10 gram KMBS per 100 mL water), to the solution that is showing a high response (the red STOP LED is on, signal on the LCD screen is above 50, beeper is on). Stir continuously.
a. If now, the red STOP light goes off, green PROCEED LED is on, the beeper stops, signal drops below 50:
i. Electrode is OK
ii. The original high signal is probably due to small amounts of free iodine in the Reactant.
iii. If the original high signal was above 1000, either replace the Acid Solution and Reactant, or test for high reagent blank.
b. If the high response continues, Electrode is “HOT” and needs conditioning.
i. Leave in this solution with the instrument attached and turned on, in SO2 mode.
ii. Let run for 1-2 hours. (Note the instrument will shut off after 30 minutes so you will have to turn it back on from time to time).
iii. Repeat the Liquid SO2 Test. If probe is still not passing, contact Tech Support.
- 1. Prepare 0.10% KMBS: add 0.10 gram KMBS to 100 mL DI water.
- 2. Place 25 mL DI water in a beaker
- 3. Add 2 mL SO2 Acid Solution and 2 mL SO2 Reactant as usual
- 4. Attach SO2 electrode, turn on instrument in SO2 mode, press ENTER if requested.
- 5. Place SO2 electrode in beaker and stir/swirl
- 6. If signal is below 200, reagents are probably OK, although a reading over 50 indicates that the blank is a little high.
- 7. If signal is above 200 (and red STOP/beeper active), add 1 drop (50 uL) of the 0.10% KMBS, continue stirring.
- 8. If the signal does not drop below 50 (and green PROCEED/beeper quiet) then replace Acid and Reactant.
return to SO2 problems Back to Top
___________________________________________________________________________
The platinum wires at the immersible end of your SO2 electrode should be bright and shiny. Often you can see reddish-brown or sometimes white accumulation on them. Here’s how to clean them:
1. Soak the SO2 electrode in a little of your SO2 Acid Solution for about 2 minutes and rinse with DI water.
2. Soak the electrode in 0.1 to 1 M NaOH (the TA Titrant or 1N NaOH), or 10 g/L soda ash (sodium carbonate) with stirring for about 2 minutes. Rinse with DI water.
3. Using the back edge of a pocket knife or something similar, remove any accumulation by gently scraping the two platinum wires, being sure not to bend or break them.
4. Thoroughly rinse with DI water and try your test again.
return to SO2 problems Back to Top
___________________________________________________________________________
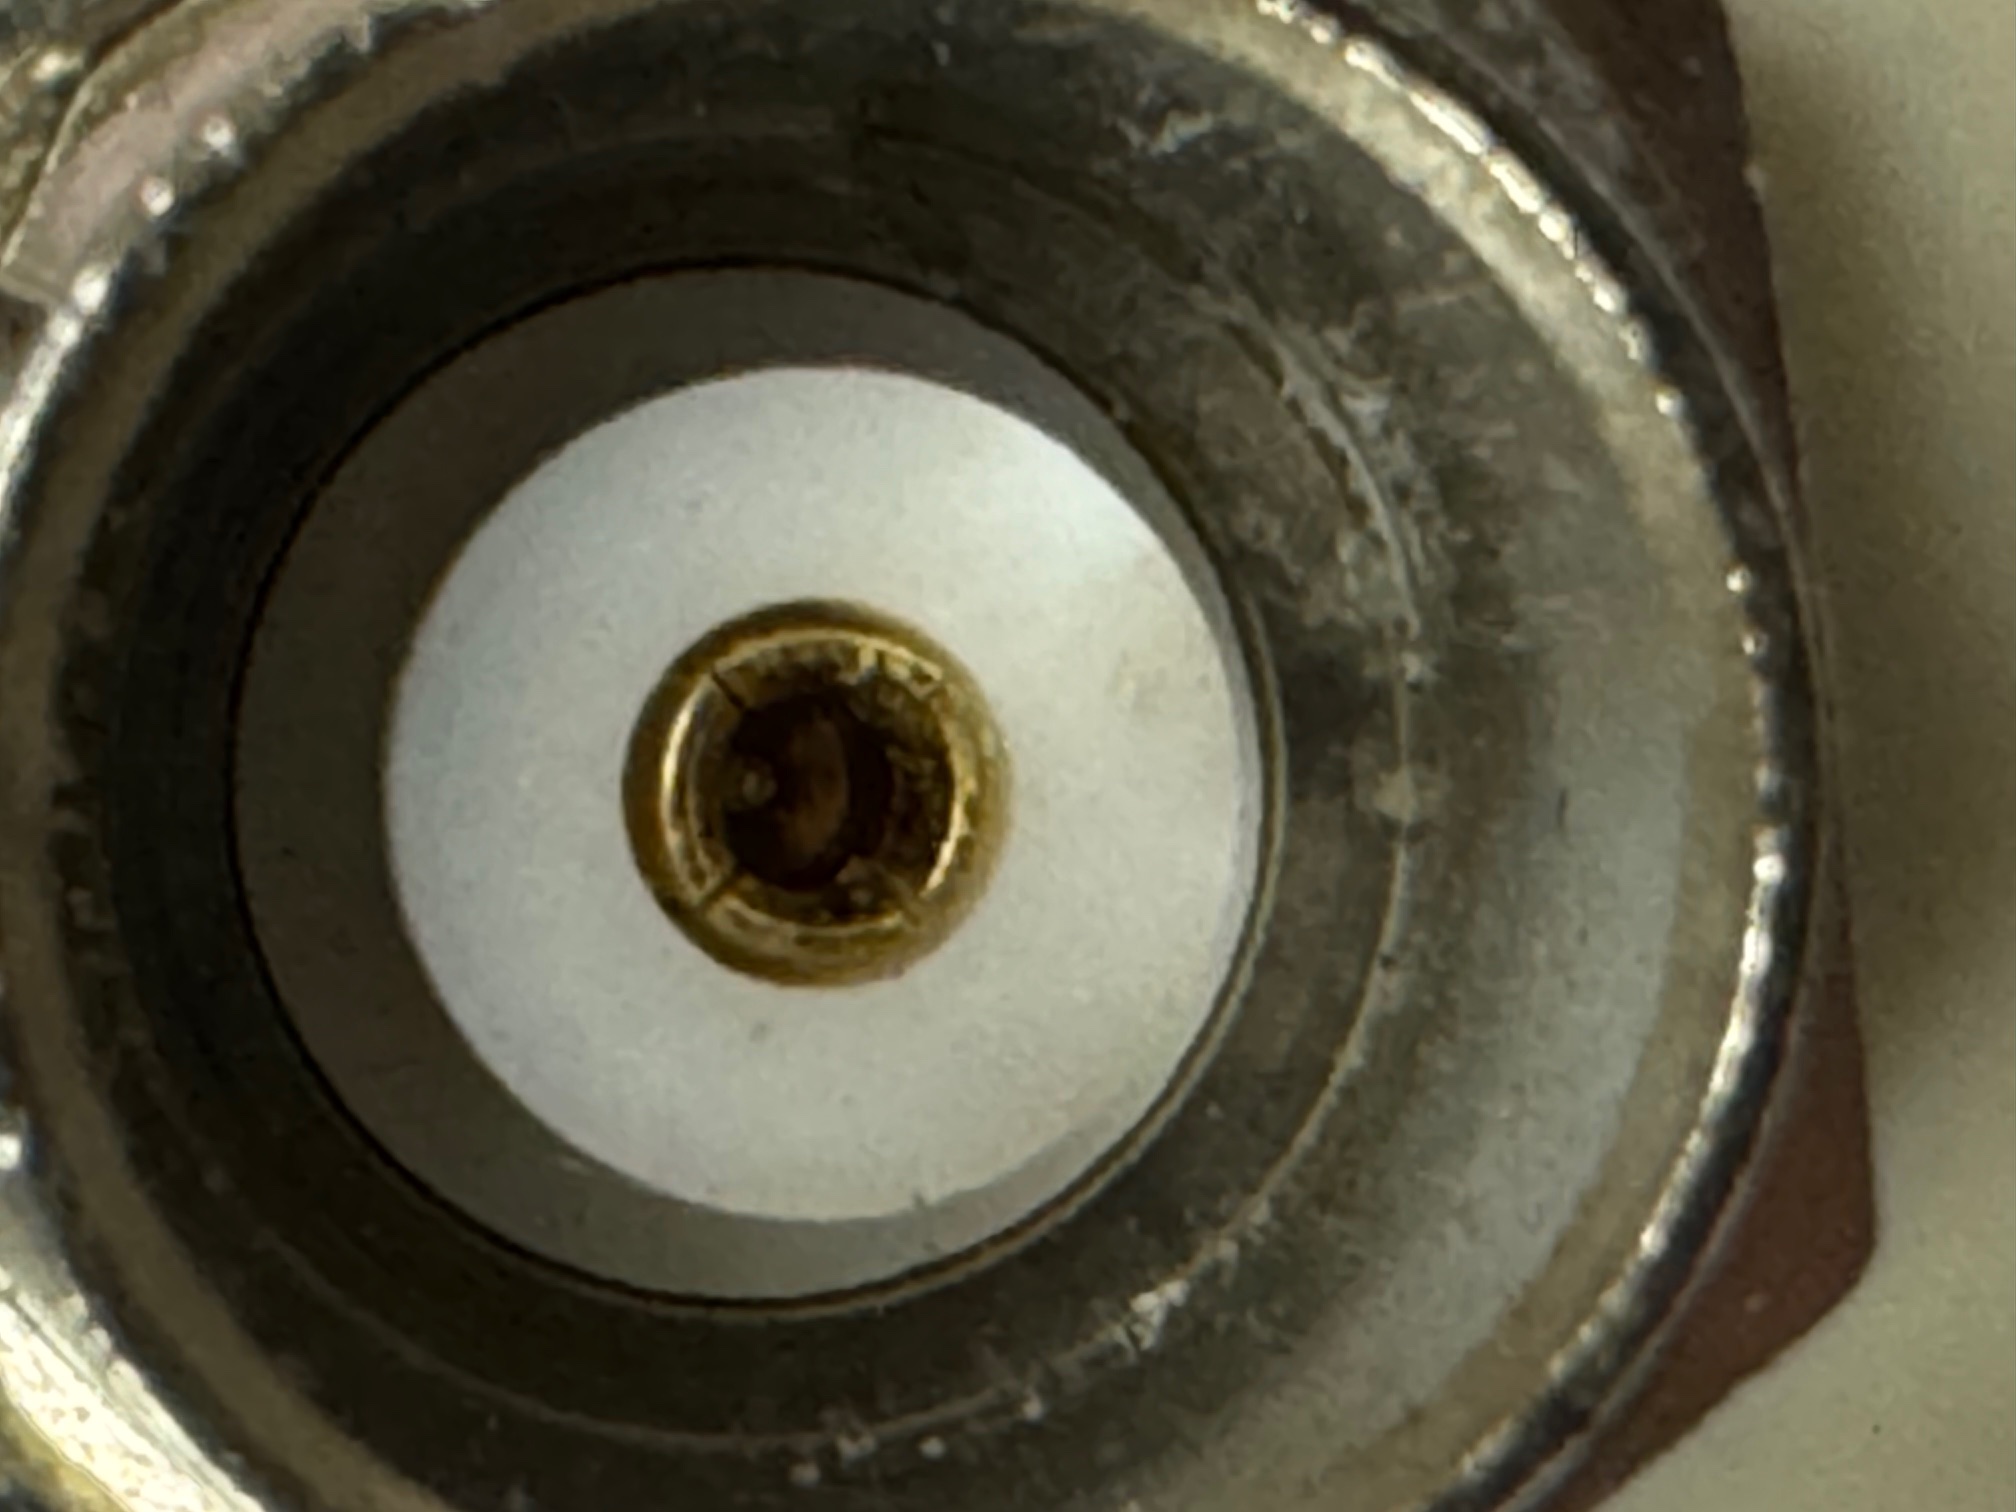
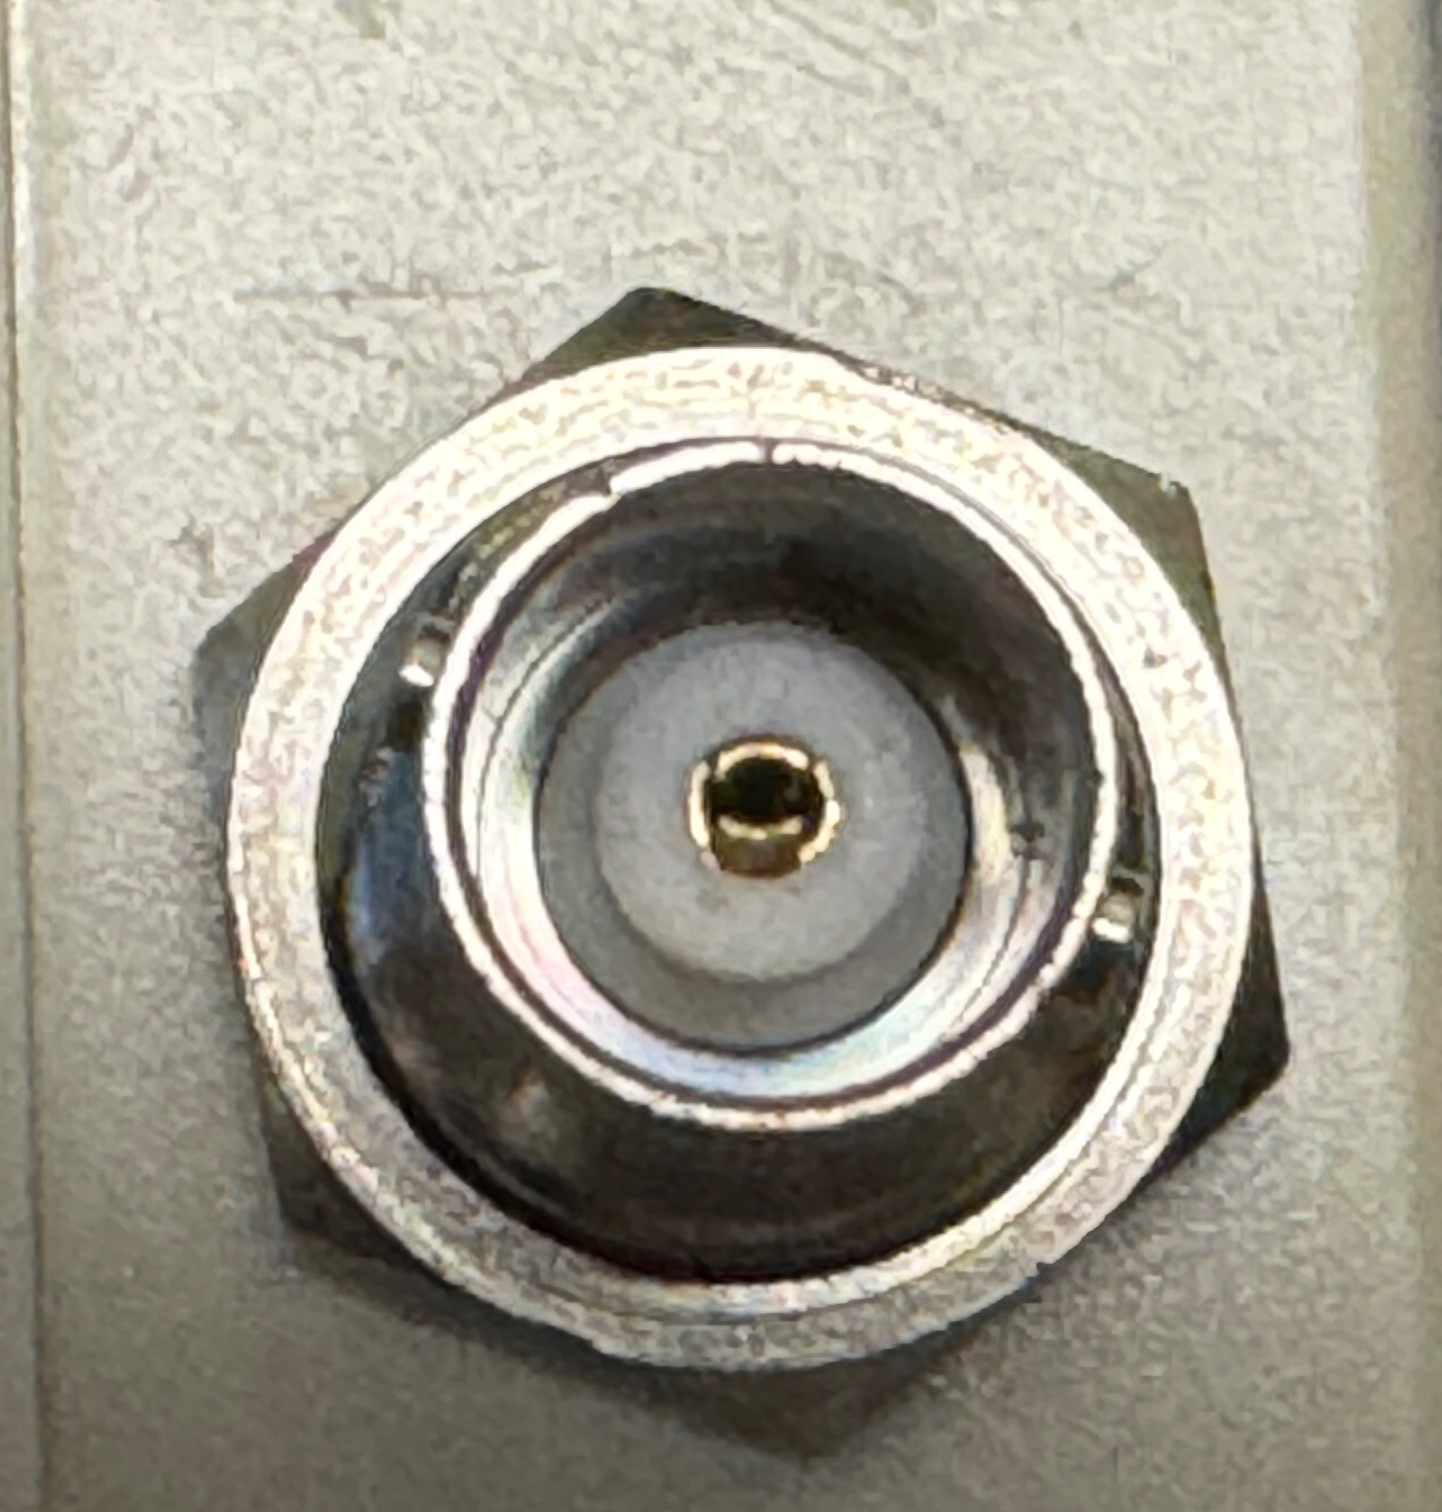
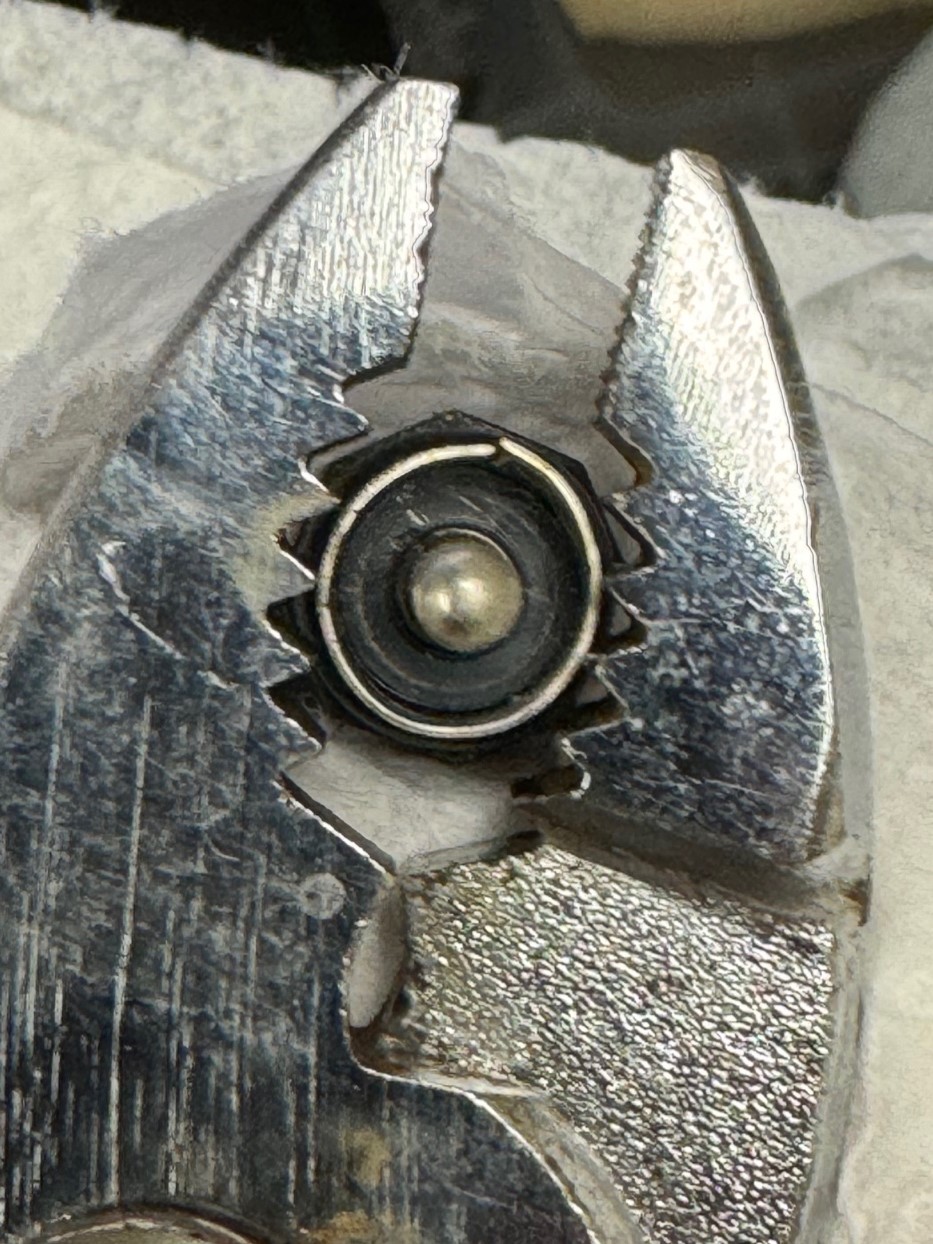
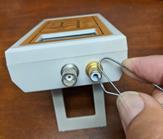
To do the short out test for pH or SO2, remove the electrode from the instrument. Short out the center pole of the connector to its outer edge using a metal paper clip or similar metal device. Figures 1-4 below show the test on pH and SO2 connectors on the latest version of the SC-300. Figures 5 and 6 show connectors on older models of SC-300 and SC-100A
Click the result you observed:
pH short out test passed SO2 short-out test passed
pH short out test failed SO2 short-out test failed


- The SC-55 does not power on, or behaves erratically on the display: Check the battery and replace if necessary.
- The instrument reading does not return to 0.0 after releasing a sample vial; or, little or no response is seen on inserting a vial into the assembly; or a response is low and steadily increasing over the course of a few seconds: Check to be sure the insertion needle is not plugged or partially obstructed.
- Disconnect the needle assembly.
- Draw back the plunger of the 5 mL syringe and connect the needle assembly to the syringe end using your luer lock connector.
- Push the syringe plunger to force obstructing material out of the needle. Check for free flow by suspending the needle in water while pushing the plunger. A steady stream of bubbles should flow easily out the end of the needle. You can order replacement needle/assemblies from Vinmetrica (part number SC-50-15).
- Values drift up or down when reading
- It is normal for values to decrease slowly; that is why we recommend taking the initial highest value.
- If values keep increasing past about 5 seconds after the insertion event, take a reading at the same time point (15-20 seconds later) for all samples.
- Possible interferences with the Assay
Very high alcohol levels (above 20% ABV) may change the response of the system somewhat. The boiling step generally reduces levels far enough to limit this problem. For very high alcohol levels, you can further dilute the wine in distilled water to bring the concentration below 10% ABV. High free SO2 levels (>30ppm) may impact the Biopressure agent. Again, boiling will help this, but if needed you can dilute the wine sample as above. - What if I did not shake the vial during the 45 minute incubation period? Do I need to start over? Is this vial no longer good?
We recommend that you shake your vial at the 15 minute and 30 minute mark during incubation to ensure that the Biopressure agent gets thoroughly mixed and remains so. However, the agent stays pretty well in suspension provided it is shaken well at the beginning as in step 8. And make sure that your sample has had a good thorough shake before performing the CO2 pressure reading step (step 16).
return to MLF Problems Back to Top
Other Instrument malfunction
If you bought your instrument less than 2 years ago, it is still under warranty. Contact us for advice on any repairs.
1. Instrument won’t power on.
a. Check and replace batteries if needed
b. Check battery terminals for broken wires or corrosion; clean if needed
2. LCD display demonstrates missing segments
a. Contact Tech Support – usually replacement of the LCD screen is needed.
3. Buttons don’t operate properly
a. If a button appears to be stuck in the “pressed” position, sometimes you can free it by putting a small piece of adhesive tape on the button face and pulling up on it.
b. Otherwise, call Tech Support for repair information
4. Probe connectors on the instrument are loose
a. If instrument is off of its 2-year warranty, these can usually be fixed by the user. Contact Tech Support.
Tech Support: 760-494-0597 x102 or info@vinmetrica.com
return to pH return to SO2 problems return to MLF Problems Back to Top
___________________________________________________________________________
My LCD screen is missing segments. Can you tell me the cost and how long it takes to repair these?
sc-300 sn4675 is also on the device
Jill,
usually the LCD screen can’t be repaired. If you send your instrument in to us we will verify the status. If the LCD is out, the cost is $100 to replace it. Check your Email for more information.
Thank you,
Rich
We have a problem with our Vinmetrica SC-300 when measuring SO2. No response, i.e. 0.0 all time during the titration. We have tried the short-out test but it failed. Please advice.
Eva,
Its possible a wire is loose inside the unit. I would suggest calling our Tech Support line to see if they can help diagnose the problem over the phone. If not, we can always take a look at your unit for you and make any repairs necessary. You can discuss this with Tech Support when you call them.
Thank you
Taylor
Measuring Free Sulfite (SO2) by Titration
V = 5.0 mL – .4.2 mL = .8 mL ) My calculation
.8 X 20 is 1.6
My question is does the 1.6 equal PPM
Lawrence,
You are correct. The calculation gives you results in ppm (or mg/L). However your decimal place is not in the correct spot. 0.8 x 20 = 16 ppm.
Let us know if you have any other questions.
Taylor
6/22/23
We need to run TOTAL SO2 on wine samples. The procedure says to add 10 mL 1N NaOH to 25 mL of wine, mix well and let stand for ~10 min. How critical is the waiting time? We frequently process 8-10 samples on a given day. I’d like to add the NaOH to all the samples at once, then start the titration process after the 10-min waiting period. However, with so many samples, it may be 30 min or longer before I finish. This means that the later samples will be exposed to the NaOH longer than the earlier samples. Is this exposure time detrimental to the accuracy of the titration? Will some of the SO2 be lost during this longer waiting time? Is it better to treat the samples sequentially (vs. simultaneously) so that the 1 exposure time to the NaOH is as near as possible to the specified 10-min period?
Thanks!
William,
the waiting time is not critical. In fact in our latest version of the manual we suggest letting the NaOH treated sample go 20-30 minutes. Any SO2 will be in the non-volatile sulfite form during this time, so there is no need to worry about loss due to volatility. Keep air access limited.
-Rich
7/7/23
Dear Rich,
Thanks for your reply of June 28. I appreciate the information.
The user manual for our SC-300 is Version 2.1d. On your website, I found Version 3.0d. Is this the latest version? I checked the section on how to run Total SO2, but there was nothing about increasing the wait time for NaOH-trt’d samples from 10- to from 20-30 min. Is Version 3.0d the last version or is there a newer one that I didn’t find?
Also, for doing the Total SO2, you mention that for the NaOH-trt’d samples the air access should be limited. We do the treatment in small glass beakers. I assume we could limit air access by sealing the beakers w/ Parafilm. Is that sufficient?
Thanks again for your help!
Bill Colonna
Midwest Grape & Wine Industry Institute, Iowa State University, Ames, IA 50011
Bill- We have sent a copy of the new manual to your email address. We should get it uploaded here on our website very soon. There you will see that we recommend a 20 minute wait time and covering the vessel to restrict airflow.
Taylor
Just received a new SC-55 and ran a quantitative test. First off, the meter reads .06-.07 kPA as a default before any readings. When testing the 0.0 Malic Acid standard, the reading starts at -0.45 and increases slowly to -0.23 over the next 20 seconds or so. The readings with the 0.4 standard and wine sample seem fairly normal, though it starts at one number, then proceeds to drift upwards for all the samples. How do I deal with the negative readings on the zero MA standard in my equation and what do I do about the readings drifting upward?
Thanks
JV
Hey Jesse,
Thank you for reaching out to us. We are going to send you an email with some answers to your questions. Check your email in a little bit.
Thank you
Taylor
I took have the same issue as Jesse.
Some values start off with a negative reading and this just steadily drift higher from the original reading.
I’ve following the troubleshooting instructions about checking for obstructions, etc.
Ray, Normally we don’t see a negative response for the 0.0 standard. This suggests possibly a temperature decrease during the test. An upward drifting is less unusual and when it occurs we suggest more vigorous shaking prior to reading, and avoiding opportunity for any temperature change, like that caused by handling the glass part of the vial. If it continues, we suggest taking a reading at 15 seconds for all tests.
We just released an updated version of the assay that shows improved performance. Did you get this version? The test kit now has an “assay diluent” that you use to prepare the wine samples. This has usually removed the issue of wine samples giving negative responses and/or lower responses than the 0.0 standard. Check the latest manual here at https://vinmetrica.com/wp-content/uploads/ManualsDataSheets/Manual_SC55.pdf
I have an SC-300 and cannot calibrate for ph. I can get a “good calibration” in the 4.01 solution but get nothing when the probe is in the 7.00 solution. I have tried to reset the ph calibration, but it does not work. My firmware is 3.2.d.
Kurt,
It sounds like it might be best if you call our tech support line so we can help diagnose what might be going on.
Taylor
Having a problem calibrating the Vinmetrica for the first time. The meter reads 1.10 to start and I cannot calibrate using the 4.01 and the 7.00 solution.
Lawrence,
Its probably best if you give our Tech Support a call. It appears as though you have quite a unique issue. Please call 760-494-0597 and select Tech Support.
Taylor
I have the Vinemetrica 300 and just received a brand new so2 electrode as I felt I was getting incosistent readings before. I used the new electrode (which has 3 adaptors to get to the female RCA connector on the unit) yesterday and it indicated 16ppm in my wine. I added about 35ppm kmbs and now it acts if I have over 100ppm. It appears when I jiggle the cord it then beeps, but goes back down. I don’t have any faith in the readings. I believe i got the unit between 2014 and 2016. Disappointed with this unit I am trying to determine what to do. Is there something else wrong? If I want to just get a new unit can I buy that without all the paraphenalia (pipettes, etc).
Richard,
The SO2 electrodes are fairly robust and rarely have issues so it could be possible that your old SO2 electrode is dirty and you might not have needed a new one. The reason for the adapters is because we do not manufacture the SO2 electrode with your termination anymore. After making some updates to the units back in 2015 we moved to a different style connector. I am sorry about that but the adapters should not cause any issues.
Have you looked at our Troubleshooting Guide? There are some steps there for determining what might be happening with your SO2 electrode (both the new and the old). If that is unsuccessful you can always give our tech support line a call and we would be more than happy to help walk you through some steps. 760.494.0597 and select Tech Support.
We can also discuss the option of buying a new unit only. That is totally doable. We can also inspect and test your unit for you if you want us to. Tech support should be able to help you with this and advise you on a suggested next step.
Please give us a call at your convenience and we would be more than happy to help. Our tech support wont be in the office until after 9am PST today.
Thank you
Taylor
Hello, Is there something wrong with my SC-300 SO2 meter? When measuring SO2, the SC-300 reads 0 while continuing to add the titrant, then with one more drop shoots into the thousands. When I first measured SO2, it responded similarly to the YouTube video, where the reading will slowly increase until it reached a stop level.
Johnathan,
Its hard to say what might exactly be going on but there are a few things you can do to try and narrow it down. If you hover over the Support tab on our website there is a Troubleshooting Guide that will walk you through some steps to see what might be happening with your SO2 test. My guess is that you either need to clean your SO2 probe (the instructions are listed on the Troubleshooting Guide) or you may have little to no sulfite in your wine. Give the troubleshooting guide a try and if you have any questions or issues, let us know.
Thanks for the inquiry.
Taylor
I have an SC-300, it appears the digital readout when I do a PH reading is malfunctioning. I can not see all of the numbers, they are cut off. Can this be repaired and if so how do I get it repaired. I am in Sterling, CT 06377
Ross,
It sounds like you LCD screen needs to be replaced. The cost for this repair is $75 plus shipping. If you want to send in your instrument, please call our tech support line and they can set you up with an RMA number so you can send us your equipment. Let me know if you have any other questions.
Taylor
Can pre-fermented juice be checked for SO2 ?
Yes, it can. No change in the usual procedure is needed.
-Rich
Some of the segments on the LCD of my SC-300 have stopped working. Is this a known issue with worksaround? Do you offer a repair service (we are in Spain)?
Thanks
Andy,
It sounds like your LCD screen needs to be replaced. I am sorry for the issue. The only workarounds are in SO2 mode, CAL and maybe in TA mode. You don’t really need to see the digits on the screen since you are only counting the beeps at or near the end of the titration. You should be able to still perform those three tests without the screen functioning. In TA and CAL mode, it is obviously very helpful to have the screen but they can be done without it. The only mode that will be an issue is pH mode since you cannot read the full numbers.
We do have a repair service but this does get tricky since you are in Spain. We have a distributor in Denmark that has made repairs for us on our instruments. I can check with them to see if this is something they can do. Or you can always ship it back to us for the repair. We would recommend insuring it and getting tracking on the package as we have been seeing some issues with our postal delivery services lately.
Let me know what you decide and Ill reach out to our distributor.
Thank you
Taylor
I absolutely LOVE my Vinmetrica SC-200 & SC-300 meters! Accurate, reliable information every time!
But now, they need a little maintenance love from me!
I would like to purchase 4 of the bottles with the cap & rubber gasket used for storing the probes in the buffering solution when not in use. One has a little split in the plastic side wall. It is not leaking, but 2 others are showing “stress lines” also. I want a 4th for a spare.
I do not have a part number, so I appeal to you for assistance.
Roger,
Thank you for your inquiry. We are glad to hear that you love your Vinmetrica units. We always recommend doing some basic maintenance on them every year. The replacement storage solution vials can be found here: https://vinmetrica.mystagingwebsite.com/product/replacement-storage-solution-vial-for-ph-electrode/ . They do not come with fresh solution so you may want to get some of that too. We recommend replacing the solution at least once a year or if your solution gets cloudy or has debris in it.
Let me know if you need any additional help.
Thanks
Taylor
I have sc300 that is giving wacky readings. I seem to remember there were two test to do that would tell me if a problem, but cant find them. I remember one was to ground the probe. Thanks
Tracy,
Thanks for contacting us. One of the tests is to ground out the instrument. You are correct. To test the functioning of the instrument:
1. Be sure the battery is good per the manual’s instructions.
2. Remove the electrode to expose the BNC connector at the back of the instrument. Turn on the instrument and select SO2 mode. Short out the terminals on the connector, using a paper clip or similar metal piece to touch the center pin of the connector to its outer metal sheath. The device should indicate “STOP” with its red LED and buzzer or beeper. If this does not happen there may be a problem with the instrument; contact us for more information. Make sure you are making a good connection here.
3. Connect the electrode and put it in about 20 mL of distilled water; add about 1 ml (half a bulb squeeze) of each of the acid solution and the reactant and swirl in the usual way keeping constant motion. The instrument may or may not indicate STOP as above. If it does not, add a drop of the SO2 Titrant solution. This should make the STOP condition occur. [If it doesn’t you may have an electrode problem read in the next section below how to fix this.] Now add one drop of a concentrated sulfite solution (1-10% is fine) and verify that the STOP signal ends and the PROCEED light illuminates. If this happens, your electrode is probably OK as well.
4. Finally, you can check your SO2 reagents with the Ascorbic Acid Test, this is found on the trouble shooting page.
Let us know how it goes.
Taylor